Trastornos neurológicos inducidos por el consumo excesivo ...
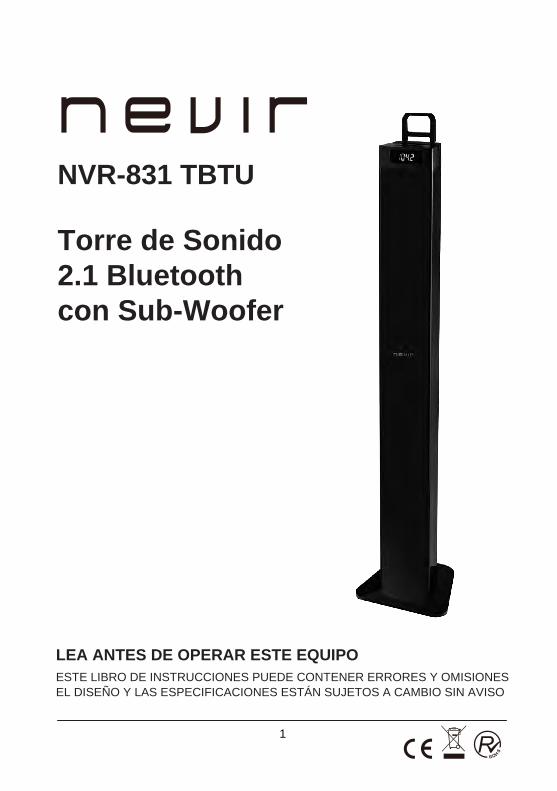
NVR-831 TBTU
Torre de Sonido 2.1 Bluetooth con Sub-Woofer
LEA ANTES DE OPERAR ESTE EQUIPOESTE LIBRO DE INSTRUCCIONES PUEDE CONTENER ERRORES Y OMISIONES EL DISEÑO Y LAS ESPECIFICACIONES ESTÁN SUJETOS A CAMBIO SIN AVISO
1

2
Advertencias y precauciones
r
l
l
r
PRECAUCIÓN: PARA EVITAR DESCARGAS ELÉCTRICAS, HAGA COINCIDIR LA HOJA ANCHA DEL ENCHUFE CON LA RANURA ANCHA DE LA TOMA DE CORIENTE E INSERTE COMPLETAMENTE.ADVERTENCIA: Para reducir el riesgo de incendio o de descarga eléctrica, no exponga este aparato a lluvia o humedad.PRECAUCIÓN: El uso de controles, ajustes o la ejecución de procedimientos distintos a los que se especifican aquí puede ocasionar exposición a radiación peligrosa.ADVERTENCIA:Los cambios o modificaciones que se efectúen a esta unidad no aprobados expresamente por la parte responsable del cumplimiento podrían anular la autoridad del usuario de operael equipo. ADVERTENCIA: No coloque esta unidad directamente sobre superficies de muebles que tengan algún tipo de acabado suave, poroso o sensible. Al igual que con cualquier compuesto de goma hecha a base de aceites, las patas pueden producir marcas o manchas en el sitio donde se coloquen. Recomendamosel uso de una barrera protectora como un paño o una pieza de vidrio entre la unidad y la superficie, a fin de evitar el riesgo de daños o manchas. ADVERTENCIA: El uso de esta unidad cerca de luz fluorescente puede causar interferencia en el uso decontrol remoto. Si la unidad muestra un comportamiento errático, retire de cualquier luz fluorescente, ya que esto pude ser la causa.PRECAUCIÓN: Peligro de explosión si se reemplaza con la batería incorrecta. Reemplace solo con emismo tipo o un tipo equivalente.ADVERTENCIA: La batería, las baterías y el paquete de baterías no deben exponerse a calor excesivo como el sol directo, el fuego o fuentes similares.ADVERTENCIA: Las baterías de litio, como todas las baterías recargables son reciclables y deben serecicladas o eliminadas en la basura doméstica normal. Comuníquese con sus autoridades locales para las prácticas de eliminación o de reciclaje en su área. Nunca deben incinerarse, ya que pueden explotar. ADVERTENCIA: Peligro de descarga eléctrica - No abrir.ADVERTENCIA: El enchufe de la alimentación o el adaptador del enchufe se usan como el dispositivopara desconexión y deben estar disponibles durante el uso normal. Para desconectar completamente el aparato de la alimentación eléctrica, debe desconectarse completamente el enchufe o el adaptador dNo quite la rejilla que protege la barra de sonido y cubre la placa electrónica. Cualquier tipo de manipulación debe realizarse por un Servicio Técnico de Nevir S.A.
e la toma de corriente.
El símbolo del rayo con punta de flecha dentro de un triángulo equilátero pretende alertar al usuario de la presencia de "voltaje peligroso" en el interior del producto que puede ser de magnitud suficiente para constituir un riesgo de descarga eléctrica.
El signo de exclamación dentro de un triángulo equilátero pretende alertar al usuario de la presencia de importantes instrucciones de operación y mantenimiento (servicio) en la literatura que acompaña al aparato.
ADVERTENCIA: PARA REDUCIR EL RIESGO DE DESCARGA ELÉCTRICA, NO RETIRE LA CUBIERTA (O EL RESPALDO) NO HAY PARTES EN EL INTERIOR QUE REQUIERAN MANTENIMIENTO DEL USUARIO. PARA SERVICIO, RECURRA A PERSONAL DE SERVICIO CALIFICADO.
Instrucciones de seguridad importantes1. Lea estas instrucciones. 2. Conserve estas instrucciones. 3. Preste atención a todas las advertencias.4. Siga todas las instrucciones.5. No utilice este aparato cerca de agua.
Limpie con un paño húmedo solamente.6. No obstruya ninguna abertura de
ventilación. Instale de acuerdo con las instrucciones del fabricante.
7. No instale cerca de fuentes de calor como radiadores, registros de calefacción, estufas u otros aparatos (incluidos los amplificadores) que producen calor.
8. No anule el propósito de seguridad del enchufe polarizado o de tierra.
9. Un enchufe polarizado tiene dos hojas, una más ancha que la otra. Un enchufe de tierra tiene dos hojas y una tercera pata de tierra. La hoja ancha de la tercera pata se suministra para su seguridad. Si el enchufe incluido no entra en su toma de corriente, consulte a un electricista para el reemplazo de la toma obsoleta.
10. Proteja su cordón de alimentación, evita caminar sobre este o pellizcarlo, prestando especial atención a los cables en los enchufes, tomas de corriente y en el punto en el que salen del producto.
11. Use solamente aditamentos/accesorios especificados por el fabricante.
En la caja debe haber: Torre de sonido BluetoothAdaptador de alimentación de enchufe redondo VDEControl remotoCable RCACable de alimentaciónManual del usuario
12. Este símbolo indica que este producto utiliza doble aislamiento entre las piezas de voltaje peligroso y las piezas a las que el usuario puede acceder. Use sólo con carros, stands, trípodes, soportes o mesas recomendadas por el fabricante o vendidos con el producto. Si se usa un carro, extreme precauciones al mover el conjunto del carro/aparato para evitar lesiones por caídas.
13. Desconecte el aparato durante tormentas eléctricas o cuando no se vaya a utilizar por un largo periodo de tiempo.
14. Para servicio, recurra a personal de servicio calificado. Se requiere servicio si el aparato se ha dañado de cualquierforma, tal como el cable de alimentación o el enchufe dañados, si se han derramado líquidos o han caído objetos dentro del aparato, si el aparato ha sido expuesto a la lluvia o humedad, si no funciona normalmente o si se ha caído.
Nota especial: Al colocar su unidad sobre un acabado de laca o natural, proteja el mobiliario con un paño u otro material de protección.
3

UBICACIÓN DE LOS CONTROLES
12 131. Botón POWER Presione para encender o apagar el altavoz de torre.2. Botón SOURCE Presione repetidamente para seleccionar la entrada
de audio del receptor de Bluetooth, AUX, LINE in, FM o USB.3. TUN+: Presione para navegar hacia adelante en las
estaciones de radio.4. TUN-: Presione para navegar hacia atrás en las estaciones
de radio.5. VOLUME +: Presione para aumentar el volumen.6. VOLUME -: Presione para reducir el volumen.7. Puerto USB.8. Antena de FM.9. Enchufe de entradas AUX/L/R IN.10. Enchufe de entrada LINE IN de 3,5 mm.11. Enchufe de entrada de corriente continua DC12. Pantalla LCD.13. Sensor remoto.
DISTANCIA EFECTIVA DEL TRANSMISOR REMOTO
NOTAS:1. Cuando hay algún obstáculo entre la
unidad y el transmisor, es posible que el transmisor no funcione.
2. En presencia de luz solar directa, una lámpara incandescente, una lámpara fluorescente o cualquier otra luz debrillo fuerte sobre el SENSOR REMORO de la unidad, la operación remota puede volverse inestable.
4
1 2 3 4 5 6
8
7
91011
4

CONTROL REMOTO - UBICACIÓN DE LOS CONTROLES
1. Botón POWER Presione para encender o apagar la unidad.2. Botón MEM/CLOCK
Presione para hacer un ciclo a través de las estaciones de radio guardadas. Presione para configurar el tiempo.
3. Botón TUN/MEM:Presione 3 segundos para buscar automáticamente estaciones de FM. Un toque para volver a hacer un ciclo a través de las estaciones de radio guardadas.
4. Botón MUSIC: Presione para cambiar al ecualizador optimizado (EQ) para la música.5. Botones TREBLE: Presione para aumentar o disminuir los agudos en el modo MUSIC. 6. Botón SOURCE: Presione para cambiar a Bluetooth, FM, AUX in LINE o USB.7. Botón MUTE: Presione para silenciar el sonido, presione de nuevo para restaurarlo.8. Botón ALARM: Presione para configurar la alarma.9. Botón SLEEP: Presione repetidamente para configurar el tiempo de sueño.10. Botón TUN-/CLOCK:
Presione hacia atrás para ajustar la frecuencia del radio. Presione hacia atrás para ajustar el tiempo.
11. Botón TUN +/CLOCK+:Presione para desplazar hacia arriba la frecuencia del radio. Presione para desplazar hacia abajo el tiempo.
12. Botón MOVE: Presione para cambiar a ecualizador optimizado (EQ) para sonido de película.
13. Botón VOICE: Presione para cambiar a ecualizador optimizado (EQ) para diálogos.14. Botones BASS: Presione para aumentar o disminuir los graves en el modo MUSIC.15. Botones VOLUME: Presione para ajustar el volumen.16. SKIP: En el modo Bluetooth, presione para ir una pista hacia adelante o hacia atrás.
Play/Pause: En el modo Bluetooth, presione para reproducir o poner en pausa una pista.
5

FUENTE DE ALIMENTACIÓN Inserte el enchufe pequeño del adaptador AC/DC proporcionado en el enchufe de corriente continua (DC) de la unidad. Inserte el otro extremo del adaptador AC/DC a la toma de corriente de la pared.
Si el aparato no detecta señal de audio desde el line-in, Aux., Bluetooth o USB; tras 60 minutos de inactividad, se apagará automáticamente.
INSTALACIÓN DE LAS BATERÍAS (CONTROL REMOTO)Para reemplazar la batería de botón:
1 Empuje el seguro y a continuación deslice elporta batería de la forma que se indica a la derecha.
2 Reemplace la batería antiguacon una nueva batería circular
CR 2025. 3 Cierre el porta baterías.
PRECAUCIONES CON LAS BATERÍAS
Siga estas instrucciones.1 Use solo el tamaño y el tipo especificado de baterías.2 Asegúrese de respetar la polaridad correcta al instalar la batería de la forma que se indica en el
compartimento de las baterías. Una batería colocada al revés puede provocar daños al dispositivo.3 Si la batería del dispositivo se ha consumido o si el dispositivo no va a usarse durante un largo
tiempo, retire las baterías para evitar daños o lesiones por un posible derrame de la batería.4 No intente recargar baterías que no son recargables, ya que pueden sobrecalentarse y romperse.5 No deben exponerse las baterías a calor excesivo como el sol directo, fuego o fuentes similares.6 Limpie los contactos de las baterías y del dispositivo antes de la instalación. 7 No mezcle tipos diferentes de baterías (por ejemplo alcalinas y de carbón) o baterías viejas con nuevas.
EMPUJEPARA
ABRIR
CR20
25
OPE
N
PU
SH
6

REPRODUCCIÓN DE USB1/. Retire el paquete de empaque.
4/. Conecte un cable de conexión (no incluido) en cada extremo como se indica en la imagen.
Frente
soporte sostén
Parte posterior Puerto USB(Reproducción de MP3)
2/. Inserte en posición de la forma que se muestra.
3/. Coloque un dispositivo externo sobre la ranura.
OPERACIÓN DE USB:
5/.
O
Memoria flash USB odispositivo de almacenamiento USB
1. Presione repetidamente el botón "SOURCE" en el control remoto o en la unidad para entrar al modo USB, el cual se indica por las palabras "USb".
2. Conecte una memoria flash USB u otro dispositivo de almacenamiento USB al enchufe de USB, la música se cargará y se reproducirá automáticamente.La pantalla se mostrará de la siguiente forma:
3. Reproduzca y ponga en pausa la pista de la canción que desee usando la navegación del control remoto. Presione para ir a la pista anterior. Presione para ir a la pista siguiente.
4. Puede reproducir música en formatos MP3, WMA y WAV.Nota:- Cuando un dispositivo está conectado, los archivos MP3 se reproducirán automáticamente.- Si no hay archivos MP3, se mostrará "nIL".
MP3SLEEP
0:39
7
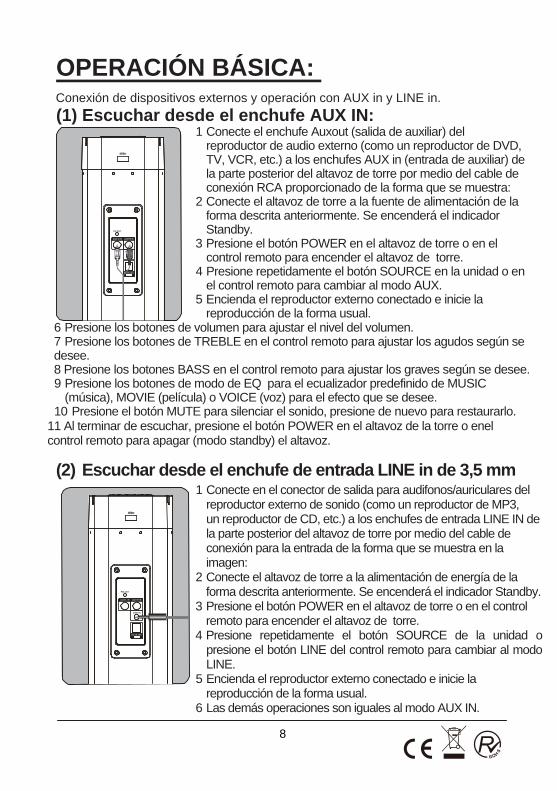
OPERACIÓN BÁSICA: Conexión de dispositivos externos y operación con AUX in y LINE in.(1) Escuchar desde el enchufe AUX IN:
1 Conecte el enchufe Auxout (salida de auxiliar) del reproductor de audio externo (como un reproductor de DVD, TV, VCR, etc.) a los enchufes AUX in (entrada de auxiliar) dela parte posterior del altavoz de torre por medio del cable de conexión RCA proporcionado de la forma que se muestra:
2 Conecte el altavoz de torre a la fuente de alimentación de la forma descrita anteriormente. Se encenderá el indicador Standby.
3 Presione el botón POWER en el altavoz de torre o en el control remoto para encender el altavoz de torre.
4 Presione repetidamente el botón SOURCE en la unidad o en el control remoto para cambiar al modo AUX.
5 Encienda el reproductor externo conectado e inicie la reproducción de la forma usual.
6 Presione los botones de volumen para ajustar el nivel del volumen.7 Presione los botones de TREBLE en el control remoto para ajustar los agudos según se desee. 8 Presione los botones BASS en el control remoto para ajustar los graves según se desee.9 Presione los botones de modo de EQ para el ecualizador predefinido de MUSIC
(música), MOVIE (película) o VOICE (voz) para el efecto que se desee. 10 Presione el botón MUTE para silenciar el sonido, presione de nuevo para restaurarlo.
11 Al terminar de escuchar, presione el botón POWER en el altavoz de la torre o enel control remoto para apagar (modo standby) el altavoz.
(2) Escuchar desde el enchufe de entrada LINE in de 3,5 mm1 Conecte en el conector de salida para audifonos/auriculares del
reproductor externo de sonido (como un reproductor de MP3,un reproductor de CD, etc.) a los enchufes de entrada LINE IN de la parte posterior del altavoz de torre por medio del cable de conexión para la entrada de la forma que se muestra en la imagen:
2 Conecte el altavoz de torre a la alimentación de energía de la forma descrita anteriormente. Se encenderá el indicador Standby.
3 Presione el botón POWER en el altavoz de torre o en el control remoto para encender el altavoz de torre.
4 Presione repetidamente el botón SOURCE de la unidad o presione el botón LINE del control remoto para cambiar al modo LINE.
5 Encienda el reproductor externo conectado e inicie la reproducción de la forma usual.
6 Las demás operaciones son iguales al modo AUX IN.
8

(3) Emparejamiento de Bluetooth:Emparejamiento inicial:
1. Encienda el altavoz de la torre. Presione el botón SOURCE y seleccione el modo Bluetooth
2. La luz azul de Bluetooth del LCD destellará sin detenerse en busca de dispositivos.
3.Cuando se encuentre un dispositivo, mostrará el nombre "NVR-831 TBTU". Solo ingrese la contraseña "0000" para conectar o emparejar con el altavoz de torre.
Volver a emparejar:4. Encienda el altavoz de torre. Presione el botón SOURCE y seleccione el modo
Bluetooth.5. La luz azul de Bluetooth del LCD destellará 3 segundos y encuentra
automáticamente el último dispositivo con que fue emparejado. Cuando se encuentra el dispositivo, puede reproducir directamente.
6. Si no se encuentra un dispositivo, la luz de Bluetooth del LCD continuará destellando sin detenerse. Ingrese la contraseña para iniciar o presione el botón SOURCE para seleccionar FM, AUX in, LINE in o USB.
(Configuración de Bluetooth) NOTA:1. El altavoz Bluetooth solo se conecta con un dispositivo a la vez. Apague el
altavoz Bluetooth para emparejar el dispositivo con otro dispositivo Bluetooth.2. La máxima transmisión entre el altavoz Bluetooth y los dispositivos es de 10 m
o 32 pies.3. Puede ocurrir interferencia durante la reproducción si la función Bluetooth se
utiliza cerca de otros dispositivos inalámbricos. Si la reproducción por medio de Bluetooth es problemática, mueva el altavoz Bluetooth y el dispositivo de reproducción a una ubicación diferente o, en su lugar, use el cable para la entrada de conector de 3,5 mm.
(4) Escuchar y configurar el radio FMAntena FMAjuste la antena de cable FM (incluida) para obtener la mejor señal de recepción.
Sintonización del radio FM1 Presione el botón POWER para encender el altavoz de torre. 2 Presione el botón SOURCE para cambiar al modo de radio FM.3 Presione los botones TUN+/CLOCK+ o TUN-/CLOCK- en el control remoto
para sintonizar el radio FM.
Escuchar una estación de radio guardada1 Presione el botón POWER para encender el altavoz de torre. 2 Presione el botón SOURCE para cambiar al modo de radio FM.3 Presione los botones TUN/MEM del control remoto para hacer un ciclo a través
de las estaciones de radio guardadas.
9

Guardar una estación de radio1 Siga las instrucciones para la sintonización del radio FM.2 Presione los botones TUN+/CLOCK+ o TUN-/CLOCK- en el control remoto
para ajustar una frecuencia de radio deseada.3 Después de sintonizar una estación deseada, presione el botón
MEM/CLOCK. 4 Presione el botón MEM/CLOCK para guardar la estación de radio actual en
lapreconfiguración seleccionada. Se pueden guardar 20 estacionesen la memoria del altavoz.
(5) Configuración del reloj1 Presione el botón POWER para apagar la unidad.2 Presione el botón MEM/CLOCK en el control remoto. 3 La hora empezará a destellar en la pantalla LCD.4 Presione el botón TUN+/CLOCK + o TUN-/CLOCK- en el control remoto para
ajustar la hora hacia arriba o hacia abajo.5 Presione de nuevo el botón MEM/CLOCK en el control remoto para confirmar la
configuración y automáticamente se pasará a la configuración de los minutos.6 Presione el botón TUN+/CLOCK + o TUN-/CLOCK- en el control remoto para
ajustar los minutos hacia arriba o hacia abajo.7 Presione de nuevo el botón MEM/CLOCK en el control remoto para confirmar la
configuración.
(6) Configuración del temporizador SLEEP1 Presione el botón POWER para encender la unidad.2 Presione repetidamente el botón SLEEP para seleccionar el temporizador
predefinido. Los tiempos predefinidos disponibles son 5, 10, 15, 30, 60 y 90 minutos.
3 Al agotarse el tiempo predefinido, la barra de la torre se apagará automáticamente.
(7) Configuración de la alarma1 Presione el botón POWER para encender el altavoz de torre.2 Presione el botón SOURCE y seleccione el modo FM en el control remoto.
Presione el botón TUN+/CLOCK + o TUN-/CLOCK- para seleccionar la frecuencia de radio deseada.
3 Presione el botón ALARM en el control remoto para apagar. 4 Presione el botón ALARM en el control remoto.5 La hora en la pantalla LCD empezará a destellar.6 Presione el botón TUN+/CLOCK + o TUN-/CLOCK- en el control remoto para
ajustar la hora hacia arriba o hacia abajo.7 Presione de nuevo el botón ALARM en el control remoto para confirmar la
configuración y automáticamente se pasará a la configuración de los minutos.8 Presione el botón TUN+/CLOCK + o TUN-/CLOCK- en el control remoto para
ajustar los minutos hacia arriba o hacia abajo.9 Presione de nuevo el botón ALARM en el control remoto para confirmar la
configuración. 10 Al agotarse el tiempo de dormir predefinido, la ALARMA reproducirá la estación de radiopredefinida.
10

GUÍA PARA LA RESOLUCIÓN DE PROBLEMAS Problema Qué hacer
No enciende Verifique la conexión del adaptador AC/DC entre el altavoz de torre y la toma de corriente de la pared.
No hay sonidoVerifique que el control del volumen NO esté al mínimo
Verifique que NO esté seleccionado MUTE.
El control remoto no funciona.
Inspeccione o reemplace la batería.
Asegúrese de que no haya obstáculos enfrente del altavoz de torre.
No hay sonido en el modo Bluetooth
Verifique que haya efectuado el emparejamiento. Es necesario emparejar el reproductor de Bluetooth externo y el altavoz de torre con la contraseña "0000" antes de la primera reproducción.
ESPECIFICACIONES GENERALES Fuente de alimentación …………………………......... CD 18V1,6A,Alimentación del control remoto: CD 3V, 1X CR 2025 batería (incluida) Consumo de energía………………...…………………………………....>50W Potencia del sonido:Woofer .…………………………………...................................................... 30WCanal izquierdo ….………………………......................................................10WCanal derecho ....………………………........................................................10WCobertura de la radio …………………………...............…….. FM 87.5-108.0 MHz Impedancia de los altavoces: Woofer..………………………….…................................… 8 Ohm,25W x 2Canal izquierdo ………..………………......................................... 4 Ohm,15W Canal derecho…………………………........……………………….. 4Ohm,15W
11

Según la directiva de Residuos de Aparatos Eléctricos y Electrónicos (RAEE), los residuos AEE han de recogerse y tratarse por separado. Si en un futuro necesita desprenderse de este producto NO lo ponga en los residuos domésticos, envíelo a los puntos de recogidas de residuos existentes en su área. De igual manera, debe extraer los residuos de pilas y/o acumuladores antes de la entrega del RAEE a través de los canales de recogida separada habilitados al efecto (distribuidores y/o instalaciones de las Entidades Locales).
Para dar cumplimiento a la Norma UNE EN-60335, indicamos que si el cable flexible se daña únicamente puede ser sustituido por un taller de reparación reconocido por NEVIR S.A. ya que se necesitan herramientas especiales.
12
Warnings and Precautions CAUTION: TO PREVENT ELECTRIC SHOCK, MATCH WIDE BLADE OF PLUG TO WIDE SLOT, FULLY INSERT.WARNING: To reduce the risk of fire or electric shock, do not expose this apparatus to rain or moisture.CAUTION: Use of any controls or adjustments or performance of procedures other than those herein specified may result in hazardous radiation exposure.WARNING: Changes or modifications to this unit not expressly approved by the party responsible for compliance could void the user’s authority to operate the equipment.WARNING: Do not place this unit directly onto furniture surfaces with any type of soft, porous, or sensitive finish. As with any rubber compound made with oils, the feet could cause marks or staining where the feet reside. We recommend using a protective barrier such as a cloth or a piece of glass between the unit and the surface to reduce the risk of damage and/or staining.WARNING: Use of this unit near fluorescent lighting may cause interference regarding use of the remote. If the unit is displaying erratic behavior move away from any fluorescent lighting, as it may be the cause.CAUTION: Danger of explosion if battery is incorrectly replaced. Replace only with the same or equivalent type.WARNING: The battery, batteries, and battery pack shall not be exposed to excessive heat such as sunshine, fire, or the like. WARNING: Lithium batteries, like all rechargeable batteries are recyclable and should be recycled or disposed of in normal household waste. Contact your local government for disposal or recycling practices in your area. They should never be incinerated since they might explode.WARNING: Shock hazard - Do Not Open.WARNING: Mains Plug or Direct plug-in adapter is used as disconnect device and it should remain readily operable during intended use. In order to disconnect the apparatus from the mains completely, the Mains Plug or Direct plug-in adapter should be disconnected from the mains socket outlet completely.
WARNING: TO REDUCE THE RISK OF ELECTRIC SHOCK, DO NOT REMOVE COVER (OR BACK). NO USER-SERVICEABLE PARTS INSIDE. REFER SERVICING TO QUALIFIED SERVICE PERSONNEL.
The lightning flash with arrowhead symbol, within an equilateral triangle, is intended to alert the user to the presence of uninsulated "dangerous voltage" within the product's enclosure that may be of sufficient magnitude to constitute a risk of electric shock to persons.
The exclamation point within an equilateral triangle is intended to alert the user to the presence of important operating and maintenance (servicing) instructions in the literature accompanying the appliance.
13
Important Safety Instructions 1 Read these Instructions. 2 Keep these Instructions. 3 Heed all Warnings. 4 Follow all instructions. 5 Do not use this apparatus near water. 6 Clean only with a dry cloth. 7 Do not block any ventilation openings. Install in accordance with the manufacturer’s instructions. 8 Do not install near any heat sources such as radiators, heat registers, stoves, or other apparatus (including amplifiers) that produce heat. 9 Do not defeat the safety purpose of the polarized or grounding - type plug. A polarized plug has two blades with one wider than the other. A grounding type plug has two blades and a third grounding prong. The wide blade or the third prong are provided for your safety. When the provided plug does not fit into your outlet, consult an electrician for replacement of the obsolete outlet. 10 Protect the power cord from being walked on or pinched particularly at plugs, convenience receptacles, and the point where they exit from the apparatus. 11 Only use attachments/accessories specified by the manufacturer. 12 This symbol indicates that this product incorporates double insulation between hazardous mains voltage and user accessible parts. Use only with a cart, stand, tripod, bracket, or table specified by the manufacturer, or sold with the apparatus.When a cart is used, use caution when moving thecart/apparatus combination to avoid injury from tip-over.
In the box, it should have : Bluetooth Sound Tower VDE round plug power adaptor Remote control RCA cable Line cable User manual
13 Unplug this apparatus during lightning storms or when unused for long periods of time. 14 Refer all servicing to qualified service personnel. Servicing is required when the apparatus has been damaged in any way, such as power-supply cord or plug is damaged, liquid has been spilled or objects have fallen into the apparatus, the apparatus has been exposed to rain or moisture, does not operate normally,or has been dropped.
Special note: When placing your unit on a lacquered or natural finish, protect your furniture with a cloth or other protective material.
14
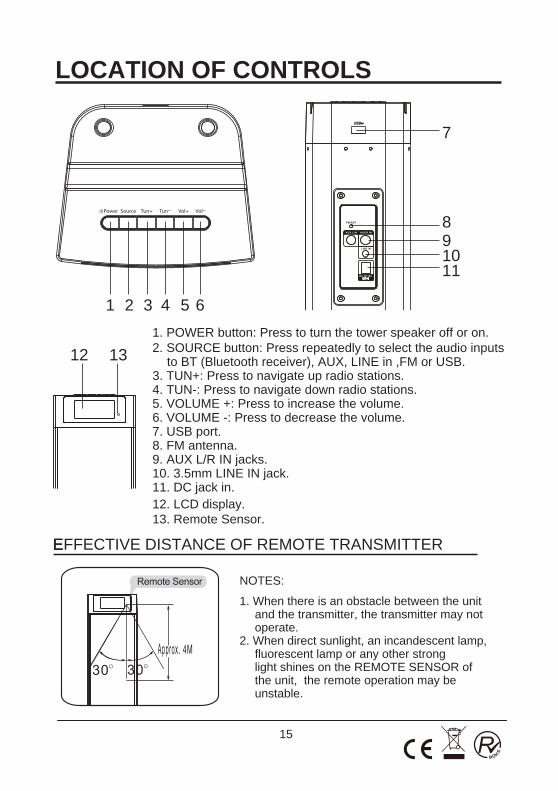
LOCATION OF CONTROLS
1. POWER button: Press to turn the tower speaker off or on. 2. SOURCE button: Press repeatedly to select the audio inputs to BT (Bluetooth receiver), AUX, LINE in ,FM or USB.
3. TUN+: Press to navigate up radio stations. 4. TUN-: Press to navigate down radio stations. 5. VOLUME +: Press to increase the volume. 6. VOLUME -: Press to decrease the volume. 7. USB port. 8. FM antenna. 9. AUX L/R IN jacks. 10. 3.5mm LINE IN jack. 11. DC jack in. 12. LCD display.13. Remote Sensor.
1 2 3 4 5 6
8
7
91011
EEFFECTIVE DISTANCE OF REMOTE TRANSMITTER
NOTES: 1. When there is an obstacle between the unit and the transmitter, the transmitter may not operate.
2. When direct sunlight, an incandescent lamp, fluorescent lamp or any other strong light shines on the REMOTE SENSOR of the unit, the remote operation may be unstable.
4M
12 13
15

REMOTE CONTROL – LOCATION OF CONTROLS
9. SLEEP button: Press repeatedly to set the sleep time.
12. MOVIE button: Press to switch to the EQ optimized for movie sound.
1. POWER button: Press to turn the unit on or off. 2. MEM/CLOCK button: Press to cycle through saved radio stations.
Press to set the time. 3. TUN/MEM button: Press 3 seconds to search automatically FM stations.
One touch to re-cycle through saved radio stations. 4. MUSIC button: Press to switch to the EQ optimized for music. 5. TREBLE buttons: Press to adjust the treble up or down at MUSIC mode. 6. SOURCE button: Press to switch to Bluetooth, FM, AUX in LINE in or USB. 7. MUTE button: Press to mute the sound, press again to resume. 8. ALARM button: Press to set the alarm.
13. VOICE button: Press to switch to the EQ optimized for dialogue. 14. BASS buttons: Press to adjust the bass up or down at MUSIC mode. 15. VOLUME buttons: Press to adjust the volume.16. SKIP: In Bluetooth mode, press to skip forward or back one track. Play/Pause: In Bluetooth mode, press to play or pause a track.
11. TUN +/CLOCK+ button: Press to navigate up radio frequency. Press to navigate down the time.
10. TUN-/CLOCK-button: Press backward to adjust radio frequency. Press backward to adjust the time.
16
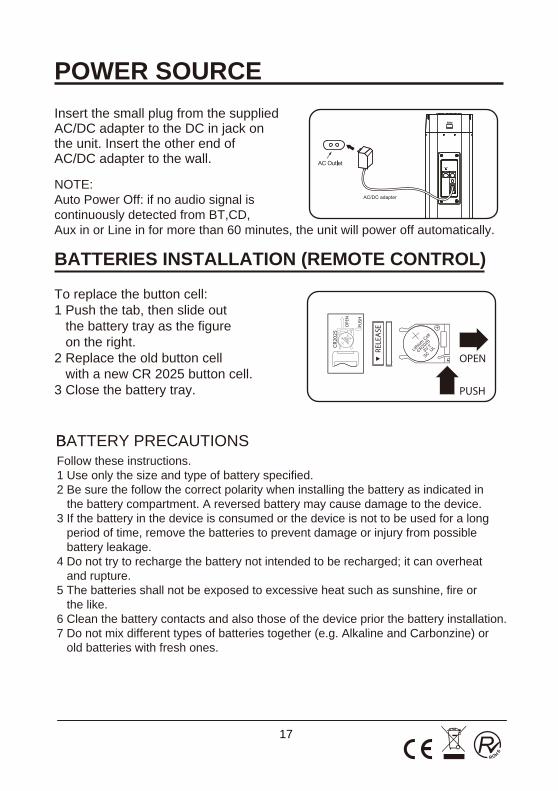
POWER SOURCE Insert the small plug from the supplied AC/DC adapter to the DC in jack on the unit. Insert the other end of A
NOTE: Auto Power Off: if no audio signal is continuously detected from BT,CD,Aux in or Line in for more than 60 minutes, the unit will power off automatically.
C/DC adapter to the wall.
BATTERIES INSTALLATION (REMOTE CONTROL)
To replace the button cell: 1 Push the tab, then slide out the battery tray as the figure on the right. 2 Replace the old button cell with a new CR 2025 button cell. 3 Close the battery tray.
PUSH
OPEN
CR2
025
PUSH
OPE
N
Lithium C
ell
CR2025
3
V S
C UL
Lithiu
m Cell
CR20
25
3
V
SC U
L
BBATTERY PRECAUTIONSFollow these instructions.1 Use only the size and type of battery specified. 2 Be sure the follow the correct polarity when installing the battery as indicated in the battery compartment. A reversed battery may cause damage to the device. 3 If the battery in the device is consumed or the device is not to be used for a long period of time, remove the batteries to prevent damage or injury from possible battery leakage. 4 Do not try to recharge the battery not intended to be recharged; it can overheat and rupture. 5 The batteries shall not be exposed to excessive heat such as sunshine, fire or the like. 6 Clean the battery contacts and also those of the device prior the battery installation. 7 Do not mix different types of batteries together (e.g. Alkaline and Carbonzine) or old batteries with fresh ones.
17

1/. Take out the holding bracket from the package.
2/. Insert it into the position as shown.
3/. Place a external device over the slot.
4/. Plug in a piece of connection
5/.
OR
cable (not included)at each end as photo shown.
USB PLAYBACK
holding bracket
RearFront
Note : - When a Device is connected, it will automatically play MP3 files.- If there is no MP3 file, It display will show “nIL”.
USB Port (MP3 Playback)
USB flash orUSB storage device
USB OPERATION:1. Press “SOURCE” button on the remote control or on the unit repeatedly to enter USB mode, indicated by “USb” wording.2. Connect a USB flash or other USB storage device to the USB jack, music will be loaded and played automatically.
The screen will display as follows:
3. Play and Pause the desired song track using the navigation on the remote control. Press go back to previous track. Press jump to next track.4. You can play the music in MP3、WMA、and WAV format.
MP3SLEEP
0:39
18
BASIC OPERATION:
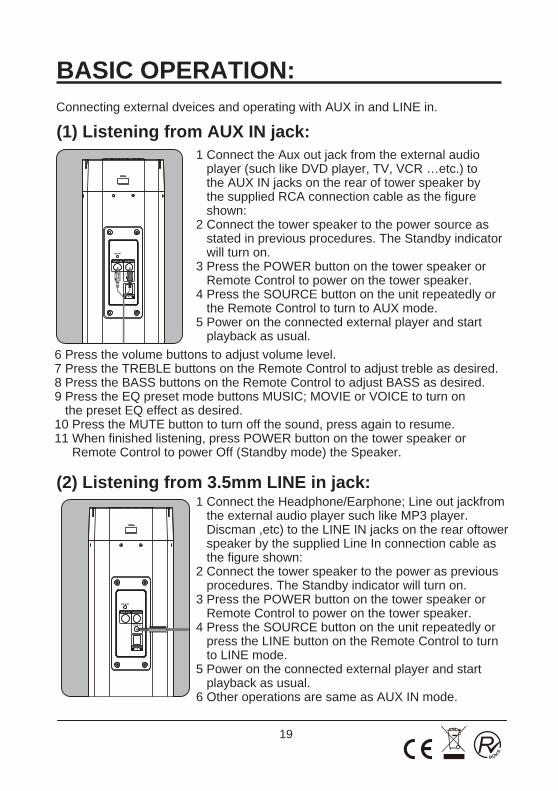
(1) Listening from AUX IN jack: 1 Connect the Aux out jack from the external audio player (such like DVD player, TV, VCR …etc.) to the AUX IN jacks on the rear of tower speaker by the supplied RCA connection cable as the figure shown: 2 Connect the tower speaker to the power source as stated in previous procedures. The Standby indicator will turn on. 3 Press the POWER button on the tower speaker or Remote Control to power on the tower speaker. 4 Press the SOURCE button on the unit repeatedly or the Remote Control to turn to AUX mode. 5 Power on the connected external player and start playback as usual.
Connecting external dveices and operating with AUX in and LINE in.
1 Connect the Headphone/Earphone; Line out jackfrom the external audio player such like MP3 player. Discman ,etc) to the LINE IN jacks on the rear oftower speaker by the supplied Line In connection cable as the figure shown: 2 Connect the tower speaker to the power as previous procedures. The Standby indicator will turn on. 3 Press the POWER button on the tower speaker or Remote Control to power on the tower speaker. 4 Press the SOURCE button on the unit repeatedly or press the LINE button on the Remote Control to turn to LINE mode. 5 Power on the connected external player and start playback as usual. 6 Other operations are same as AUX IN mode.
(2) Listening from 3.5mm LINE in jack:
6 Press the volume buttons to adjust volume level. 7 Press the TREBLE buttons on the Remote Control to adjust treble as desired. 8 Press the BASS buttons on the Remote Control to adjust BASS as desired. 9 Press the EQ preset mode buttons MUSIC; MOVIE or VOICE to turn on the preset EQ effect as desired. 10 Press the MUTE button to turn off the sound, press again to resume. 11 When finished listening, press POWER button on the tower speaker or Remote Control to power Off (Standby mode) the Speaker.
19

(3) Setting up bluetooth pairing: Initial pairing:1. Switch on the tower speaker. Press the SOURCE button and select Bluetooth mode2. Bluetooth blue LCD light will blink non-stop in searching for device.3. When a device is found, it will show the name “NVR-831 TBTU”. Just enter password "0000" to connect or pair with the tower speaker.
Re-pairing:4. Switch on the tower speaker. Press the SOURCE button and select Bluetooth mode.5. Bluetooth blue LCD light will blink 3 seconds and it is automatically finding the last device it was paired with. When the device is found, it can play backdirectly. 6. If there is no device found, the bluetooth LCD light will continue to blinknon-stop. Enter password to start with or press SOURCE button to select FM, AUX in, LINE in or USB.
(Bluetooth SET UP) NOTE: 1. The Bluetooth speaker only connects to device at a time. Turn off the Bluetooth speaker in order to pair the device with another Bluetooth device.2. The maximum transmission between the Bluetooth speaker and a deviceis 10 meters or 32 feet. 3. Interferece may occur during playback when using the Bluetooth function near other wireless devices. If playback through Bluetooth is problematic,move the Bluetooth speaker and the playback device to a different location, or use the 3.5mm audio cable jack instead of the Bluetooth function.
(4) Listening and setting up FM radioFM Antenna Adjust the FM Wire Antenna (included) to get the best reception signal.
Tuning the FM Radio1 Press the POWER button to turn the tower speaker on. 2 Press the SOURCE button to switch to FM radio mode. 3 Press the TUN+/CLOCK+ or TUN-/CLOCK-buttons on the remote to tune the FM radio.
Listening to a Saved Radio Station1 Press the POWER button to turn the tower speaker on.2 Press the SOURCE button to switch to FM radio mode. 3 Press the TUN/MEM buttons on the remote control to cycle through saved radio stations.
20

Saving a Radio Station1 Follow the instructions for tuning the FM radio.2 Press the TUN+/CLOCK+ or TUN-/CLOCK-buttons on the remote control to adjust a desired radio frequency.3 After tuning to the desired station, press the MEM/CLOCK button.4 Press the MEM/CLOCK button to save the current radio station to the selected preset. Here are 20 stations can be saved to the tower speaker′s memory.
1 Press the POWER button to switch on the unit. 2 Press the SLEEP button repeatedly to select the preset set timer. Time presets available are 5, 10, 15, 30, 60, 90 minute. 3 After the set sleep time has expired, the tower bar will automatically power off.
1 Press the POWER button to switch off the unit. 2 Press the MEM/CLOCK button on the remote control.3 The time on the LCD display will begin blinking.4 Press the TUN+/CLOCK + or TUN-/CLOCK-button on the remote control to adjust up or down the hour.5 Press MEM/CLOCK button again on the remote control to confirm the setting and it will automatically go to minute setting.6 Press the TUN+/CLOCK + or TUN-/CLOCK-button on the remote control to adjust up or down the minute.7 Press MEM/CLOCK button again on the remote control to confirm the setting.
(5) Setting the clock
(6) Setting SLEEP timer
1 Press the POWER button to turn the tower speaker on. 2 Press the SOURCE button and select the FM mode on the remote control. Press the TUN+/CLOCK + or TUN-/CLOCK-button to select the desired radio frequency. 3 Press the POWER button on the remote control to switch off the power. 4 Press the ALARM button on the remote control. 5 The time on the LCD display will begin blinking. 6 Press the TUN+/CLOCK + or TUN-/CLOCK-button on the remote control to adjust up or down the hour. 7 Press ALARM button again on the remote control to confirm the setting and it will automatically go to minute setting. 8 Press the TUN+/CLOCK + or TUN-/CLOCK-button on the remote control to adjust up or down the minute. 9 Press the ALARM button again on the remote control to confirm the setting.10 After the set sleep time has expired, the ALARM will ring the preset radio station.
(7) Setting the alarm
21
TROUBLESHOOTING GUIDE
Problem What to do
No power Check the connection of the AC/DC adapter between the tower speaker and wall outlet.
Check that the volume control is NOT at minimum No sound
Check that it is NOT set to mute.
Inspect or replace the battery. The remote control won' t work Make sure there are no obstacles obscuring the front
of the tower speaker.
No sound from in BT mode
Check if you have pairing or not. It needs to pair the external BT player and the tower speaker with password "0000" before 1st time listening.
GENERAL SPECIFICATIONS Power Source :……………………………………….......DC Power Source of Remote Control: DC 3V, 1X CR 2025 battery (Included) Power Consumption:………………………………………………………....>50W Audio Power : Woofer .…………………………………...................................................... 30W Left Channel ……………………………......................................................10W Right Channel…………………………........................................................10W Radio Coverage …..………………………...............…….. FM 87.5-108.0 MHzImpedance of Speakers : Woofer..……………………………….…................................… 8 Ohm,25W x 2 Left Channel ……………………………......................................... 4 Ohm,15W Right Channel…………………………........………………………... 4 Ohm,15W
18V 1.6A,
22
The European Directive 2002/96 /EC on Waste Electrical and Electronic Equipment (WEEE) required that old household electrical appliances must not be disposed of in the normal unsorted municipal waste stream. Old appliances must be collected separately in order to optimize the recovery and recycling of the material they contain, and reduce the impact on human health and the environment.
The crossed out “wheeled bin” symbol on the product remind you of your obligations that when you dispose of the appliance, it must be separately collected.Besides that, waste batteries and/or accumulator must be removed prior to delivery of WEEE, thought the separated collection channels provided for this purpose (distributors and/or facilities from Local Authorities)
In order to fulfill ruling UNE EN-60335, we indicate that if the flexible wire is damaged, it can only be replaced or repaired by a technical service recognized by NEVIR S.A. as per special tooling is required.
23

DECLARACIÓN DE CONFORMIDADNEVIR, S.A. Declara bajo su responsabilidad que el aparato indicado cumple los requisitos de las siguientes directivas:
EMC:Reference No.: WTD14S0413011ETest Standards: EN 55013: 2013 EN 55020: 2007+A11:2011 EN 61000-3-2: 2006 + A1: 2009+A2: 2009 EN 61000-3-2: 2006+A1:2009+A2:2009 EN 61000-3-3: 2013ERP:Reference No.: WTD 14S0413013NRelatire standard (s)/Speaification (s) / Directive (s):COMMISSION REGULATION (EC) No 1275/2008LVD:Reference No.: WTD 14S0413010STest Standards:EN 60065: 2002 + A1: 2006+A11: 2008+A2:2010 + A12: 2011NB:Expertise No.: 14-113413Applied standards and Test Reports
specification
EN 60065:2002+A1:2006+A11: 2008+A2:2010+A12:2011
EN 300 328-1 V1.7.1EN 301 489-1 V1.9.2EN 301 489-17 V2.2.1EN 62479:2010
Descripciones del aparato: Torre de Sonido 2.1 Bluetooth
Modelo NEVIR: NVR-831 TBTU
Importador: NEVIR, S.A.
Dirección del importador: NEVIR, S.A.
C/ Canteros, 14
Parque Empresarial Puerta de Madrid
28830 San Fernando de Henares, Madrid
24


![05 woofer[1]](https://static.fdocuments.mx/doc/165x107/5571f18849795947648b5b18/05-woofer1.jpg)