GUÍA PARA EL Driver’s CONDUTOR - Prevost Car · elegir la entrada auxiliar de audio como fuente...
7
Driver’s GUÍA PARA EL CONDUTOR
Transcript of GUÍA PARA EL Driver’s CONDUTOR - Prevost Car · elegir la entrada auxiliar de audio como fuente...

Driver’s GuideGUÍA PARA EL CONDUTOR
Driver’s Guide
D-MIC (Driver Microphone) On/O� - Turn volume knob to adjust mic level.
G-MIC (Guide Microphone) On/O� - Turn volume knob to adjust mic level.
CAM - Panoramic camera (Optional) On/O�.
NAV - Not applicable.
RAD/CD - Select to choose Radio/CD as audio source.
AUDIO IN - Select to choose Auxiliary Audio Input as audio source.
DVD - Select to choose DVD Player as audio/video source.
TV - Select to choose optional TV Tuner as audio/video source.
VIDEO IN - Select to choose Auxiliary Video Input as audio/video source.
VOLUME KNOB (volume adjusts from 0 to 40)AUDIOPress to rotate through choice of audio mode.
VOL BASS TREB BAL LOUD
Turn volume knob to adjust sound in each mode.
WHEN MICROPHONE IS ACTIVE, BACKGROUND AUDIO VOLUME IS ADJUSTABLE: When a microphone is activated, the current audio source volume will reduce to a certain level which has been set at the factory. To adjust this level:
1- Press and hold AUDIO button then press AUDIO IN button. The LCD panel will show “BACK GROUND”.
2- Turn the volume knob to adjust the background level.
3- Press any button to save the setting. If no button is pressed within 8 seconds, the unit automatically saves the setting and exits this mode.
GONG SOUND LEVEL A gong will sound in the passenger’s area upon activating the microphone. This gong will also sound when a passenger activates the service bell. The gong sound level can be adjusted:
1- Press and hold AUDIO button then press VIDEO IN button. The LCD panel will show “GONG PASS”.
2- Turn the volume knob to adjust the gong level.
3- Press any button to save the setting. If no button is pressed within 8 seconds, the unit automatically saves the setting and exits this mode.
While maintaining the service bell gong active, the gong sound heard upon activation of the microphones can be disabled. To do so,
1- Press and hold AUDIO button then press G-MIC button. The LCD panel will show “GONG MIC ON” or “GONG MIC OFF”.
Turn the volume knob clockwise to activate the microphones gong sound. Turn the volume knob counterclockwise to deactivate the microphones gong sound.
passenger audio/video selector
CONECTOR DE ALIMENTACIÓNDE 12 VOLTIOS
CAJA DE CONEXIONES DE AUDIO
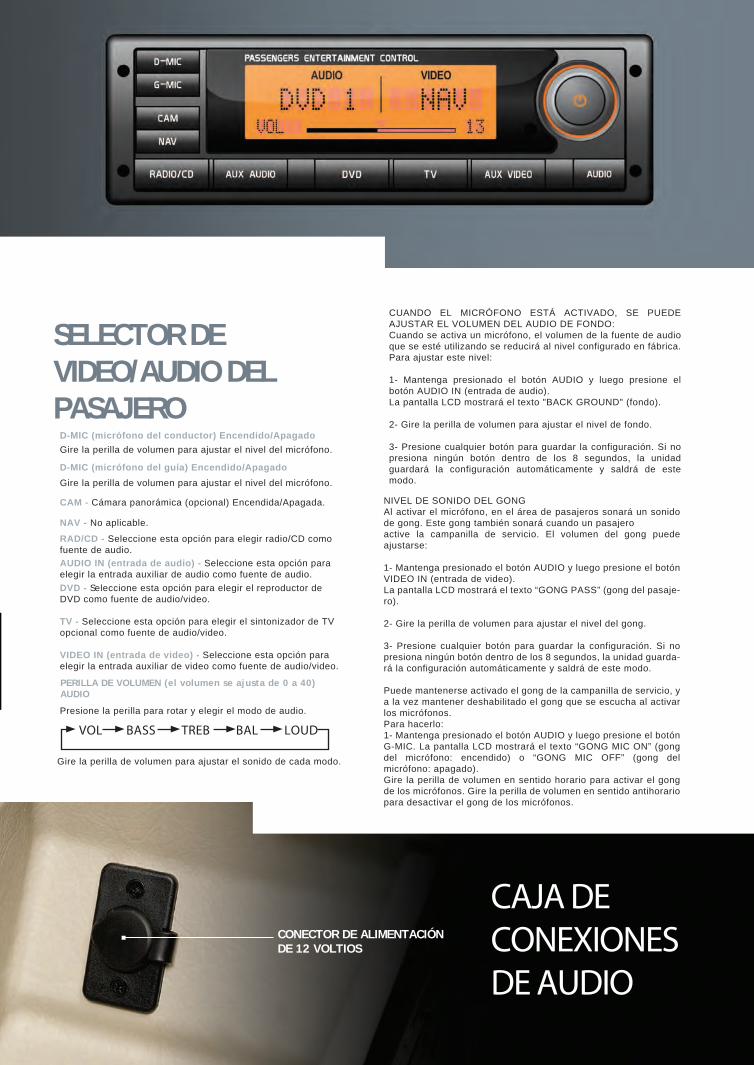
SELECTOR DE VIDEO/AUDIO DEL PASAJERO
D-MIC (micrófono del conductor) Encendido/Apagado
D-MIC (micrófono del guía) Encendido/Apagado
CAM - Cámara panorámica (opcional) Encendida/Apagada.
NAV - No aplicable.
RAD/CD - Seleccione esta opción para elegir radio/CD como fuente de audio.
Presione la perilla para rotar y elegir el modo de audio.
PERILLA DE VOLUMEN (el volumen se ajusta de 0 a 40)AUDIO
AUDIO IN (entrada de audio) - Seleccione esta opción para elegir la entrada auxiliar de audio como fuente de audio.DVD - Seleccione esta opción para elegir el reproductor de DVD como fuente de audio/video.
TV - Seleccione esta opción para elegir el sintonizador de TV opcional como fuente de audio/video.
VIDEO IN (entrada de video) - Seleccione esta opción para elegir la entrada auxiliar de video como fuente de audio/video.
Gire la perilla de volumen para ajustar el nivel del micrófono.
Gire la perilla de volumen para ajustar el nivel del micrófono.
Gire la perilla de volumen para ajustar el sonido de cada modo.
CUANDO EL MICRÓFONO ESTÁ ACTIVADO, SE PUEDE AJUSTAR EL VOLUMEN DEL AUDIO DE FONDO:Cuando se activa un micrófono, el volumen de la fuente de audio que se esté utilizando se reducirá al nivel configurado en fábrica. Para ajustar este nivel:
1- Mantenga presionado el botón AUDIO y luego presione el botón AUDIO IN (entrada de audio).La pantalla LCD mostrará el texto "BACK GROUND" (fondo).
2- Gire la perilla de volumen para ajustar el nivel de fondo.
3- Presione cualquier botón para guardar la configuración. Si no presiona ningún botón dentro de los 8 segundos, la unidad guardará la configuración automáticamente y saldrá de este modo.
NIVEL DE SONIDO DEL GONGAl activar el micrófono, en el área de pasajeros sonará un sonido de gong. Este gong también sonará cuando un pasajeroactive la campanilla de servicio. El volumen del gong puede ajustarse:
1- Mantenga presionado el botón AUDIO y luego presione el botón VIDEO IN (entrada de video).La pantalla LCD mostrará el texto “GONG PASS” (gong del pasaje-ro).
2- Gire la perilla de volumen para ajustar el nivel del gong.
3- Presione cualquier botón para guardar la configuración. Si no presiona ningún botón dentro de los 8 segundos, la unidad guarda-rá la configuración automáticamente y saldrá de este modo.
Puede mantenerse activado el gong de la campanilla de servicio, y a la vez mantener deshabilitado el gong que se escucha al activar los micrófonos.Para hacerlo:1- Mantenga presionado el botón AUDIO y luego presione el botón G-MIC. La pantalla LCD mostrará el texto “GONG MIC ON” (gong del micrófono: encendido) o “GONG MIC OFF” (gong del micrófono: apagado).Gire la perilla de volumen en sentido horario para activar el gong de los micrófonos. Gire la perilla de volumen en sentido antihorario para desactivar el gong de los micrófonos.
operating the wheelchair lift and remote
LOWER PLATFORMPress and hold DOWN button until platform contacts ground.
Verify that bridgeplate is in upright position.
Deploy each handrail by lifting up and outward to a vertical position and then pushing down to lock into place.
Carefully place wheelchair in center of platform, preferably facing outward (away from vehicle), and lock wheelchair brakes.
Pull safety belt from retractor on handrail and fasten to other handrail.
RAISE PLATFORMNOTE: These two steps apply only to F9TF models that stop upward platform movement at an intermediate level (refer to Figure ).
1- PARTIALLY RAISE PLATFORM - Press and hold UP button until platform stops at intermediate height.
2- OPEN VEHICLE DOOR - Fully open vehicle sliding door located above lift. The lift operator, or attendant should do this.
FOR OTHER MODELSPress and hold UP button until platform stops at floor height and bridgeplate lowers onto vehicle floor.
Release wheelchair brakes, and carefully board passenger into vehicle.
Preset 1- 6 Buttons• Radio: Push and release to recall preset station. • Radio: Push and hold to store preset station.
Down Arrow Button• Radio: Manual tuning down.
Menu Button• Radio: Push and release to access menu.
OK• Radio: Seek. • CD/USB: Push and release to select next tr ack. • CD/USB: Push and hold for fast forward.
Eject CD Button
Up Arrow Button• Radio: Manual tuning up.
ESC• Radio: Seek. • CD/USB: Push and release to select previous tr ack. • CD/USB: Push and hold for fast reverse. • iPod: Push and hold to enter the iPod menu (Optional).
CD Slot• Insert / Remove CD.
Rotary Knob / Power Button • Push: Power On and O� . • Turn: Volume adjust and audio value update.
TA (Tra�c Information/News)• Radio: Switch tr affic On or O�. • Radio: Cancel ongoing tr affic or news message.
Radio Select Mode• Radio: Choose from FM1, FM2, FM3 (Optional),
AM, Weather band and Satellite radio (Optional).
Audio Button• General: Audio settings.
CD/Aux Mode Select• CD/USB: Switch between sources other than r adio.
1 Power enable switch - Provides power to the pendant and thereby enables the lift.
2 Deploy - Platform moves outward from lift compartment.
3 Stow - Platform moves downward toward stow level and then retracts into lift compartment. If platform is below stow level, it must first be raised above stow level.
4 Down - Platform lowers toward ground level. Bridgeplate automatically rises when platform drops below floor level.
5 Up - Platform rises toward vehicle floor level. Bridgeplate automatically lowers when platform arrives at floor level.
DEPLOY PLATFORMPress and hold DEPLOY button until platform is completely extended from lift compartment.
NOTE: Platform cannot be moved up or down unless platform is fully extended.
driver dashboard radio
1
4
2
3
5
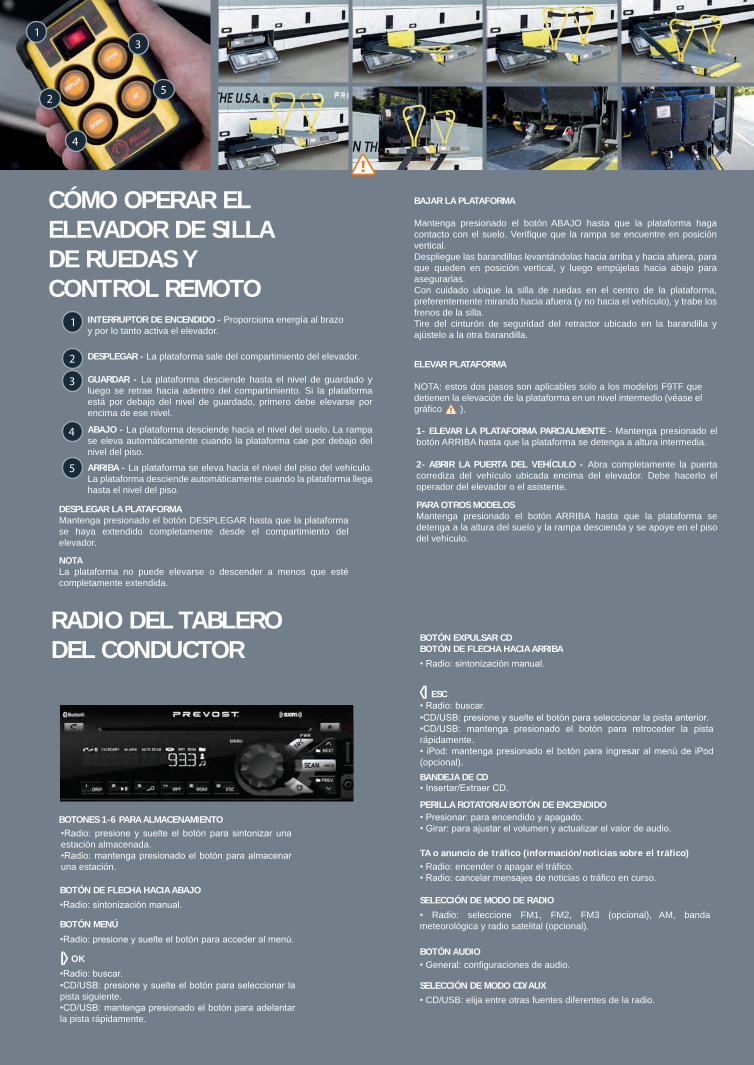
CÓMO OPERAR EL ELEVADOR DE SILLA DE RUEDAS Y CONTROL REMOTO
RADIO DEL TABLERO DEL CONDUCTOR
INTERRUPTOR DE ENCENDIDO - Proporciona energía al brazo y por lo tanto activa el elevador.
DESPLEGAR - La plataforma sale del compartimiento del elevador.
GUARDAR - La plataforma desciende hasta el nivel de guardado y luego se retrae hacia adentro del compartimiento. Si la plataforma está por debajo del nivel de guardado, primero debe elevarse por encima de ese nivel.
ABAJO - La plataforma desciende hacia el nivel del suelo. La rampa se eleva automáticamente cuando la plataforma cae por debajo del nivel del piso.
ARRIBA - La plataforma se eleva hacia el nivel del piso del vehículo. La plataforma desciende automáticamente cuando la plataforma llega hasta el nivel del piso.
DESPLEGAR LA PLATAFORMAMantenga presionado el botón DESPLEGAR hasta que la plataforma se haya extendido completamente desde el compartimiento del elevador.
NOTALa plataforma no puede elevarse o descender a menos que esté completamente extendida.
BANDEJA DE CD
PERILLA ROTATORIA/BOTÓN DE ENCENDIDO
TA o anuncio de tráfico (información/noticias sobre el tráfico)
• Radio: sintonización manual.
• Radio: buscar.
• Presionar: para encendido y apagado.• Girar: para ajustar el volumen y actualizar el valor de audio.
• Insertar/Extraer CD.
•CD/USB: presione y suelte el botón para seleccionar la pista anterior.•CD/USB: mantenga presionado el botón para retroceder la pista rápidamente.• iPod: mantenga presionado el botón para ingresar al menú de iPod (opcional).
BAJAR LA PLATAFORMA
Mantenga presionado el botón ABAJO hasta que la plataforma haga contacto con el suelo. Verifique que la rampa se encuentre en posición vertical.Despliegue las barandillas levantándolas hacia arriba y hacia afuera, para que queden en posición vertical, y luego empújelas hacia abajo para asegurarlas.Con cuidado ubique la silla de ruedas en el centro de la plataforma, preferentemente mirando hacia afuera (y no hacia el vehículo), y trabe los frenos de la silla.Tire del cinturón de seguridad del retractor ubicado en la barandilla y ajústelo a la otra barandilla.
ELEVAR PLATAFORMA
NOTA: estos dos pasos son aplicables solo a los modelos F9TF que detienen la elevación de la plataforma en un nivel intermedio (véase el gráfico ).
PARA OTROS MODELOSMantenga presionado el botón ARRIBA hasta que la plataforma se detenga a la altura del suelo y la rampa descienda y se apoye en el piso del vehículo.
1- ELEVAR LA PLATAFORMA PARCIALMENTE - Mantenga presionado el botón ARRIBA hasta que la plataforma se detenga a altura intermedia.
2- ABRIR LA PUERTA DEL VEHÍCULO - Abra completamente la puerta corrediza del vehículo ubicada encima del elevador. Debe hacerlo el operador del elevador o el asistente.
BOTÓN EXPULSAR CDBOTÓN DE FLECHA HACIA ARRIBA
• Radio: encender o apagar el tráfico.• Radio: cancelar mensajes de noticias o tráfico en curso.
• Radio: seleccione FM1, FM2, FM3 (opcional), AM, banda meteorológica y radio satelital (opcional).
• General: configuraciones de audio.
• CD/USB: elija entre otras fuentes diferentes de la radio.
SELECCIÓN DE MODO DE RADIO
BOTÓN AUDIO
SELECCIÓN DE MODO CD/AUX
ESC
BOTONES 1-6 PARA ALMACENAMIENTO
BOTÓN DE FLECHA HACIA ABAJO
BOTÓN MENÚ
•Radio: presione y suelte el botón para sintonizar una estación almacenada.•Radio: mantenga presionado el botón para almacenar una estación.
•Radio: sintonización manual.
•Radio: presione y suelte el botón para acceder al menú.
•Radio: buscar.•CD/USB: presione y suelte el botón para seleccionar la pista siguiente.•CD/USB: mantenga presionado el botón para adelantar la pista rápidamente.
OK
prevostcar.com
BRITISH COLUMBIA • CALIFORNIA • ALBERTA • TEXAS • ONTARIO • TENNESSEE • FLORIDA • NEW JERSEY • QUEBEC
© 2016 All rights reserved. “Prevost”, the Prevost logotype, Prevost model designations and all other Prevost related marks, images and symbols are trademarks, registered trademarks and/or exclusive properties.
All other trademarks are property of their respective owners. Printed in Canada. 16/10/1k
To order parts
PREVOST US PARTS CUSTOMER SERVICE
2250 Point Blvd., Suite 410 Elgin, Illinois 60123 Tel Coach Parts: 1-800-621-5519 Tel Transit Parts: 1-877-999-8808 Fax: 1-877-999-8809
PREVOST CANADA PARTS CUSTOMER SERVICE
2955-A Watt Street Quebec City, Quebec G1X 3W1 Tel: 1-800-463-8876 Fax: 1-800-939-0133
Prevost Parts & Service Centers
USA
Cal i fornia
3384 De Forest Circle Mira Loma, California 91752 Tel: 1-800-421-9958 Fax: 1-951-360-2560
Flor ida
6931 Business Park Blvd. North Jacksonville, Florida 32256 Tel: 1-800-874-7740 Fax: 1-904-886-0092
New Jersey
201 South Avenue South Plainfield, New Jersey 07080 Tel: 1-800-223-0830 Fax: 1-908-222-7304
Tennessee
800 South Cartwright Street Goodlettsville, Tennessee 37072 Tel: 1-877-299-8881 Fax: 1-615-299-8816
Texas - Ft. Worth
15200 Frye Road Fort Worth, Texas 76155 Tel: 1-866-773-8678 Fax: 1-817-685-0460
Texas - Houston
11851 Cutten Road Houston, Texas 77066 Tel: 1-877-602-0273 Fax: 1-281-315-1571
canada
Alberta
292 MacDonald Crescent Fort McMurray, Alberta T9H 4B6 Tel: 1-780-713-0274 Fax: 1-780-743-0983
Bri t ish Columbia
11911 No. 5 Road Richmond, British Columbia V7A 4E9 Tel: 1-604-940-3306 Fax: 1-604-940-3384
ONTARIO
7655 Tranmere Drive Mississauga, Ontario L5S 1L4 Tel: 1-905-738-0881 Fax: 1-905-738-0891
Quebec
850, Chemin Olivier Lévis, Quebec G7A 2N1 Tel: 1-866-870-2046 Fax: 1-418-831-7432
6 Transmission Control Pad
7 Cruise Control Switch
8 Kneeling/Front Axle Hi-Buoy (Optional) Kneeling/Full Hi-Buoy (Optional)
9 Horn Selector
10 Power Window Switch
11 Outside Rear View Mirror Heat (Optional)
12 Central Locking System
13 Mirror Controls
14 Tag Axle Control Valve
15 Parking Br akes Control Valve
16 Coolant Heater Timer
6
7
10 8
111314
9
1215
16
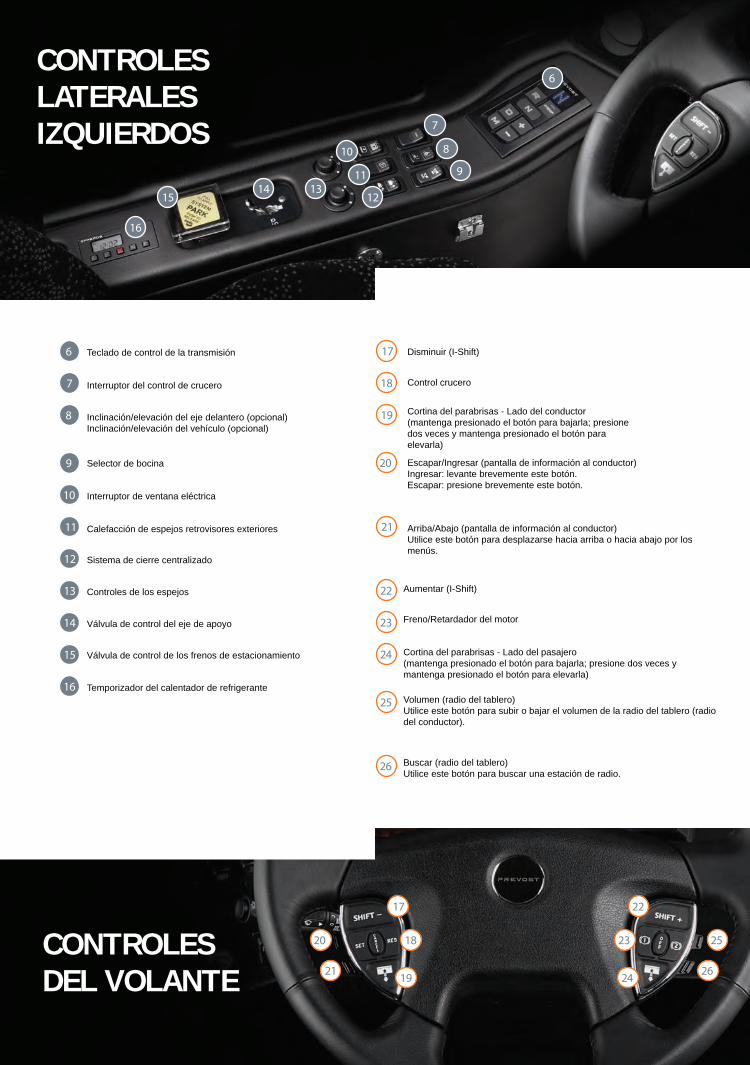
17 Shift Down (I-Shift)
18 Cruise Control
19 Windshield Blind - Driver Side (press and hold to lower; press twice and hold to r aise)
20 Escape/Enter (Driver Information Display) Enter: Lift this button briefly . Escape: Press briefly on this button.
21 Up/Down (Driver Information Display) Use this button to scroll up or down through
the menus.
22 Shift Up (I-Shift)
23 Engine Brake/Retarder
24 Windshield Blind - Passenger Side (press and hold to lower; press twice and hold to r aise)
25 Volume (Dashboard radio) Use this button to increase or decrease the
dashboard radio (driver’s radio) volume.
26 Seek (Dashboard radio) Use this button to seek up or down for a r adio station.
17 22
18 2320 25
21 2619 24
CONTROLES LATERALES IZQUIERDOS
Teclado de control de la transmisión Disminuir (I-Shift)
Control crucero
Cortina del parabrisas - Lado del conductor(mantenga presionado el botón para bajarla; presione dos veces y mantenga presionado el botón para elevarla)
Escapar/Ingresar (pantalla de información al conductor)Ingresar: levante brevemente este botón.Escapar: presione brevemente este botón.
Arriba/Abajo (pantalla de información al conductor)Utilice este botón para desplazarse hacia arriba o hacia abajo por los menús.
Interruptor del control de crucero
Inclinación/elevación del eje delantero (opcional)Inclinación/elevación del vehículo (opcional)
Selector de bocina
Interruptor de ventana eléctrica
Calefacción de espejos retrovisores exteriores
Sistema de cierre centralizado
Controles de los espejos
Válvula de control del eje de apoyo
Válvula de control de los frenos de estacionamiento
Temporizador del calentador de refrigerante
Aumentar (I-Shift)
Freno/Retardador del motor
Cortina del parabrisas - Lado del pasajero(mantenga presionado el botón para bajarla; presione dos veces y mantenga presionado el botón para elevarla)
Volumen (radio del tablero)Utilice este botón para subir o bajar el volumen de la radio del tablero (radio del conductor).
Buscar (radio del tablero)Utilice este botón para buscar una estación de radio.
CONTROLESDEL VOLANTE
6 Transmission Control Pad
7 Cruise Control Switch
8 Kneeling/Front Axle Hi-Buoy (Optional) Kneeling/Full Hi-Buoy (Optional)
9 Horn Selector
10 Power Window Switch
11 Outside Rear View Mirror Heat (Optional)
12 Central Locking System
13 Mirror Controls
14 Tag Axle Control Valve
15 Parking Br akes Control Valve
16 Coolant Heater Timer
6
7
10 8
111314
9
1215
16
17 Shift Down (I-Shift)
18 Cruise Control
19 Windshield Blind - Driver Side (press and hold to lower; press twice and hold to r
20 Escape/Enter (Driver Information Display) Enter: Lift this button briefly . Escape: Press briefly on this button.
21 Up/Down (Driver Information Display) Use this button to scroll up or down through
the menus.
22 Shift Up (I-Shift)
23 Engine Brake/Retarder
24 Windshield Blind - Passenger Side (press and hold to lower; press twice and hold to r
25 Volume (Dashboard radio) Use this button to increase or decrease the
dashboard radio (driver’s radio) volume.
26 Seek (Dashboard radio) Use this button to seek up or down for a r adio station.
17 22
18 2320
2119 24
CONTROLES LATERALES IZQUIERDOS
Teclado de control de la transmisión Disminuir (I-Shift)
Control crucero
Cortina del parabrisas - Lado del conductor(mantenga presionado el botón para bajarla; presione dos veces y mantenga presionado el botón para elevarla)
Escapar/Ingresar (pantalla de información al conductor)Ingresar: levante brevemente este botón.Escapar: presione brevemente este botón.
Arriba/Abajo (pantalla de información al conductor)Utilice este botón para desplazarse hacia arriba o hacia abajo por los menús.
Interruptor del control de crucero
Inclinación/elevación del eje delantero (opcional)Inclinación/elevación del vehículo (opcional)
Selector de bocina
Interruptor de ventana eléctrica
Calefacción de espejos retrovisores exteriores
Sistema de cierre centralizado
Controles de los espejos
Válvula de control del eje de apoyo
Válvula de control de los frenos de estacionamiento
Temporizador del calentador de refrigerante
Aumentar (I-Shift)
Freno/Retardador del motor
Cortina del parabrisas - Lado del pasajero(mantenga presionado el botón para bajarla; presione dos veces y mantenga presionado el botón para elevarla)
Volumen (radio del tablero)Utilice este botón para subir o bajar el volumen de la radio del tablero (radio del conductor).
Buscar (radio del tablero)Utilice este botón para buscar una estación de radio.
CONTROLESDEL VOLANTE
6 Transmission Control Pad
7 Cruise Control Switch
8 Kneeling/Front Axle Hi-Buoy (Optional) Kneeling/Full Hi-Buoy (Optional)
9 Horn Selector
10 Power Window Switch
11 Outside Rear View Mirror Heat (Optional)
12 Central Locking System
13 Mirror Controls
14 Tag Axle Control Valve
15 Parking Br akes Control Valve
16 Coolant Heater Timer
6
7
10 8
111314
9
1215
16
17 Shift Down (I-Shift)
18 Cruise Control
19 Windshield Blind - Driver Side (press and hold to lower; press twice and hold to r
20 Escape/Enter (Driver Information Display) Enter: Lift this button briefly . Escape: Press briefly on this button.
21 Up/Down (Driver Information Display) Use this button to scroll up or down through
the menus.
22 Shift Up (I-Shift)
23 Engine Brake/Retarder
24 Windshield Blind - Passenger Side (press and hold to lower; press twice and hold to r
25 Volume (Dashboard radio) Use this button to increase or decrease the
dashboard radio (driver’s radio) volume.
26 Seek (Dashboard radio) Use this button to seek up or down for a r
17
1820
2119
CONTROLES LATERALES IZQUIERDOS
Teclado de control de la transmisión Disminuir (I-Shift)
Control crucero
Cortina del parabrisas - Lado del conductor(mantenga presionado el botón para bajarla; presione dos veces y mantenga presionado el botón para elevarla)
Escapar/Ingresar (pantalla de información al conductor)Ingresar: levante brevemente este botón.Escapar: presione brevemente este botón.
Arriba/Abajo (pantalla de información al conductor)Utilice este botón para desplazarse hacia arriba o hacia abajo por los menús.
Interruptor del control de crucero
Inclinación/elevación del eje delantero (opcional)Inclinación/elevación del vehículo (opcional)
Selector de bocina
Interruptor de ventana eléctrica
Calefacción de espejos retrovisores exteriores
Sistema de cierre centralizado
Controles de los espejos
Válvula de control del eje de apoyo
Válvula de control de los frenos de estacionamiento
Temporizador del calentador de refrigerante
Aumentar (I-Shift)
Freno/Retardador del motor
Cortina del parabrisas - Lado del pasajero(mantenga presionado el botón para bajarla; presione dos veces y mantenga presionado el botón para elevarla)
Volumen (radio del tablero)Utilice este botón para subir o bajar el volumen de la radio del tablero (radio del conductor).
Buscar (radio del tablero)Utilice este botón para buscar una estación de radio.
CONTROLESDEL VOLANTE

Driver’s Guide
D-MIC (Driver Microphone) On/O� - Turn volume knob to adjust mic level.
G-MIC (Guide Microphone) On/O� - Turn volume knob to adjust mic level.
CAM - Panoramic camera (Optional) On/O�.
NAV - Not applicable.
RAD/CD - Select to choose Radio/CD as audio source.
AUDIO IN - Select to choose Auxiliary Audio Input as audio source.
DVD - Select to choose DVD Player as audio/video source.
TV - Select to choose optional TV Tuner as audio/video source.
VIDEO IN - Select to choose Auxiliary Video Input as audio/video source.
VOLUME KNOB (volume adjusts from 0 to 40)AUDIOPress to rotate through choice of audio mode.
VOL BASS TREB BAL LOUD
Turn volume knob to adjust sound in each mode.
WHEN MICROPHONE IS ACTIVE, BACKGROUND AUDIO VOLUME IS ADJUSTABLE: When a microphone is activated, the current audio source volume will reduce to a certain level which has been set at the factory. To adjust this level:
1- Press and hold AUDIO button then press AUDIO IN button. The LCD panel will show “BACK GROUND”.
2- Turn the volume knob to adjust the background level.
3- Press any button to save the setting. If no button is pressed within 8 seconds, the unit automatically saves the setting and exits this mode.
GONG SOUND LEVEL A gong will sound in the passenger’s area upon activating the microphone. This gong will also sound when a passenger activates the service bell. The gong sound level can be adjusted:
1- Press and hold AUDIO button then press VIDEO IN button. The LCD panel will show “GONG PASS”.
2- Turn the volume knob to adjust the gong level.
3- Press any button to save the setting. If no button is pressed within 8 seconds, the unit automatically saves the setting and exits this mode.
While maintaining the service bell gong active, the gong sound heard upon activation of the microphones can be disabled. To do so,
1- Press and hold AUDIO button then press G-MIC button. The LCD panel will show “GONG MIC ON” or “GONG MIC OFF”.
Turn the volume knob clockwise to activate the microphones gong sound. Turn the volume knob counterclockwise to deactivate the microphones gong sound.
passenger audio/video selector
CONECTOR DE ALIMENTACIÓNDE 12 VOLTIOS
CAJA DE CONEXIONES DE AUDIO
IMPORTANT - To prevent damage to the drive train components, disconnect axle shafts or driveshaft before towing
LIGHTING
Headlights and Exterior Lighting
Fog Lights (Optional)
Hazard W arning Flashers
Reading Lights
31 Interior Lighting
32 Driver’s Area Lighting
33 Brightness Control
gauges
34 Tachometer
35 Telltale Lights
36 Speedometer
37 Front Brake Air Pressure (secondary)
38 Fuel Level
39 Rear Brake Air Pressure (Primary)
40 Driver Information Display (DID)
41 Oil Pressure Indicator
42 DEF Level (Diesel Exhaust Fluid) Indicator
43 Engine Coolant T emperature
44 Turbo Boost Pressure
windshield
Upper Windshield Wipers (Optional)
Upper Windshield W asher (Optional) and Headlights Washer
Upper Windshield Defrosting
door
62 Close Door
63 Open Door
other
52 Tire Pressure Monitoring System Display (TPMS)
53 Windshield Blind Controls
54 Wheelchair Lift (Optional)
55 Fast Idle
56 Engine Br ake with I-Shift Transmission
57 Engine Stop Override
58 Ignition Switch
59 Traction Control System
60 Vehicle Clearance Information
61 Stop/Service Chime (Optional)
audio/video
64 Passenger Audio/Video Selector (see detail page)
65 Driver Dashboard Radio (see detail page)
2728
29
30 3132
33
34 36
3743
44
3841 42 3940
35
3535
3535
climate
45 HVAC Control Unit
46 Passenger Overhead Air
47 Air Registers
48 Roof Hatch F an Control (Optional)
45
46
4748
4747
4950
51
52
53
55
5958
53
56
54
57 61
60
6263
64
65
Fan Speed
Recirculate
Driver’s Area T emperature Setting
Passenger Area T emperature Setting
Windshield Defogger
Panel and F ootwell
Panel
Fahrenheit / Celsius Selector
Faros delanteros e iluminación exterior
Limpiaparabrisas superior (opcional) Pantalla del sistema de monitoreo de presión de las llantas (TPMS) Anulación de parada del motor Cerrar puertas Selector de audio/video del pasajero (véase la página de detalles)
Radio del tablero del conductor(véase la página de detalles)
Abrir puertas
-Para evitar daños en los componentes de la transmisión, desconecte los ejes propulsores y el eje de transmisión antes de remolcar el vehículo
Interruptor de encendido
Sistema de control de tracción
Información de altura del vehículo
Campanilla de parada/servicio (opcional)
Controles de cortinas de parabrisas
Elevador de sillas de ruedas (opcional)
Ralentí rápido
Freno de motor con transmisión I-Shift
Lavador de parabrisas superior (opcional) y lavador de faros delanteros
Descongelador de parabrisas superior
Iluminación interior Tacómetro Nivel de combustible Indicador de presión de aceite Unidad de control de climatización
Velocidad de ventiladores
Recircular
Configuración de la temp. del área del conductor
Configuración de la temp. del área de pasajeros
Desempañador de parabrisas
Hacia el frente y hacia los pies
Hacia el frente
Selector Fahrenheit/Celsius
Aire delcompartimiento superior del pasajero
Rejillas de ventilación
Control de ventiladores de escotillas del techo (opcional)
Indicador de nivel de DEF (líquido de escape diésel)
Temperatura del refrigerante de motor
Presión del Turbo Boost (sobrealimentación del motor)
Presión de airede los frenos traseros (primaria)
Pantallade información al conductor (DID)
Indicadores
Velocímetro
Presión de aire de los frenos delanteros (secundaria)
Iluminación del área del conductor
Control de brilloFaros antiniebla (opcional)
Luces de advertencia intermitentes
Luces de lectura
CONTROLESDEL TABLERO
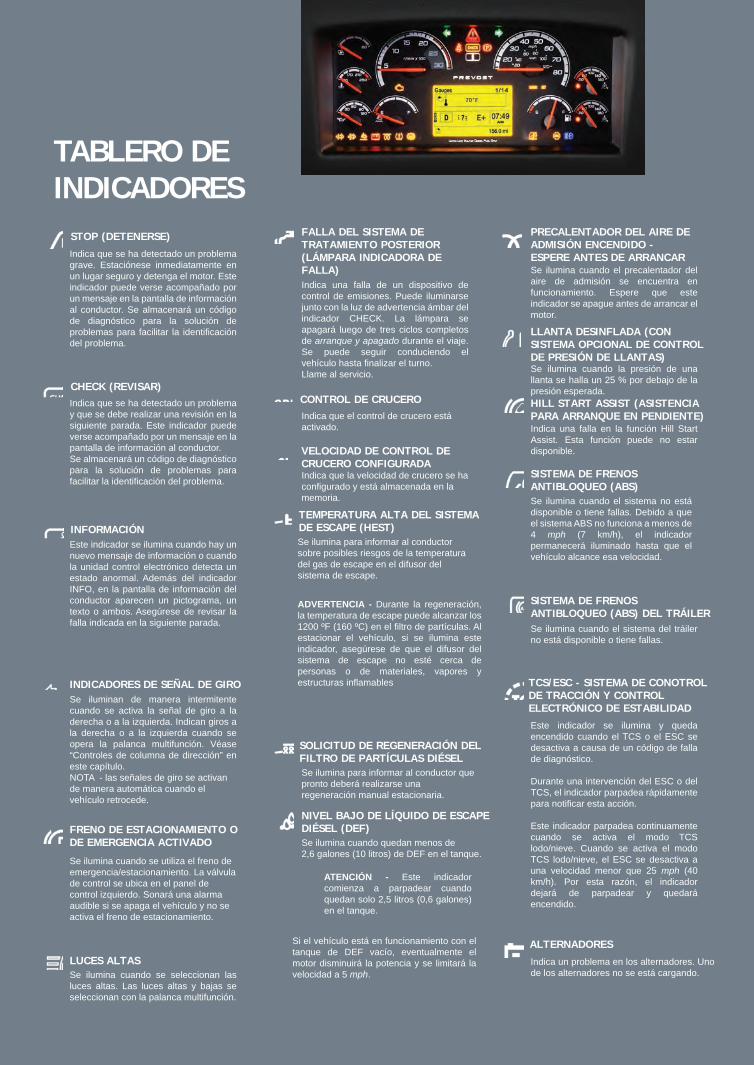
TABLERO DE INDICADORES
ILUMINACIÓN
PARABRISAS OTROS PUERTAS AUDIO/VIDEO
IMPORTANTE
MEDIDORES CLIMA DEL AMBIENTE
STOP (DETENERSE)
CHECK (REVISAR)
INFORMACIÓN
INDICADORES DE SEÑAL DE GIRO
FRENO DE ESTACIONAMIENTO O DE EMERGENCIA ACTIVADO
LUCES ALTAS
Indica que se ha detectado un problema grave. Estaciónese inmediatamente en un lugar seguro y detenga el motor. Este indicador puede verse acompañado por un mensaje en la pantalla de información al conductor. Se almacenará un código de diagnóstico para la solución de problemas para facilitar la identificación del problema.
Indica que se ha detectado un problema y que se debe realizar una revisión en la siguiente parada. Este indicador puede verse acompañado por un mensaje en la pantalla de información al conductor.Se almacenará un código de diagnóstico para la solución de problemas para facilitar la identificación del problema.
Este indicador se ilumina cuando hay un nuevo mensaje de información o cuando la unidad control electrónico detecta un estado anormal. Además del indicador INFO, en la pantalla de información del conductor aparecen un pictograma, un texto o ambos. Asegúrese de revisar la falla indicada en la siguiente parada.
Se iluminan de manera intermitente cuando se activa la señal de giro a la derecha o a la izquierda. Indican giros a la derecha o a la izquierda cuando se opera la palanca multifunción. Véase “Controles de columna de dirección” en este capítulo.NOTA - las señales de giro se activan de manera automática cuando el vehículo retrocede.
Se ilumina cuando se utiliza el freno de emergencia/estacionamiento. La válvula de control se ubica en el panel de control izquierdo. Sonará una alarma audible si se apaga el vehículo y no se activa el freno de estacionamiento.
Se ilumina cuando se seleccionan las luces altas. Las luces altas y bajas se seleccionan con la palanca multifunción.
IMPORTANT - To prevent damage to the drive train components, disconnect axle shafts or driveshaft before towing
LIGHTING
27 Headlights and Exterior Lighting
28 Fog Lights (Optional)
29 Hazard W arning Flashers
30 Reading Lights
31 Interior Lighting
32 Driver’s Area Lighting
33 Brightness Control
gauges
34 Tachometer
35 Telltale Lights
36 Speedometer
37 Front Brake Air Pressure (secondary)
38 Fuel Level
39 Rear Brake Air Pressure (Primary)
40 Driver Information Display (DID)
41 Oil Pressure Indicator
42 DEF Level (Diesel Exhaust Fluid) Indicator
43 Engine Coolant T emperature
44 Turbo Boost Pressure
windshield
49 Upper Windshield Wipers (Optional)
50 Upper Windshield W asher (Optional) and Headlights Washer
51 Upper Windshield Defrosting
door
62 Close Door
63 Open Door
other
52 Tire Pressure Monitoring System Display (TPMS)
53 Windshield Blind Controls
54 Wheelchair Lift (Optional)
55 Fast Idle
56 Engine Br ake with I-Shift Transmission
57 Engine Stop Override
58 Ignition Switch
59 Traction Control System
60 Vehicle Clearance Information
61 Stop/Service Chime (Optional)
audio/video
64 Passenger Audio/Video Selector (see detail page)
65 Driver Dashboard Radio (see detail page)
2728
29
30 3132
33
34 36
3743
44
3841 42 3940
35
3535
3535
climate
45 HVAC Control Unit
46 Passenger Overhead Air
47 Air Registers
48 Roof Hatch F an Control (Optional)
45
46
4748
4747
4950
51
52
53
55
5958
53
56
54
57 61
60
6263
64
65
Fan Speed
Recirculate
Driver’s Area T emperature Setting
Passenger Area T emperature Setting
Windshield Defogger
Panel and F ootwell
Panel
Fahrenheit / Celsius Selector
Faros delanteros e iluminación exterior
Limpiaparabrisas superior (opcional) Pantalla del sistema de monitoreo de presión de las llantas (TPMS) Anulación de parada del motor Cerrar puertas Selector de audio/video del pasajero (véase la página de detalles)
Radio del tablero del conductor(véase la página de detalles)
Abrir puertas
-Para evitar daños en los componentes de la transmisión, desconecte los ejes propulsores y el eje de transmisión antes de remolcar el vehículo
Interruptor de encendido
Sistema de control de tracción
Información de altura del vehículo
Campanilla de parada/servicio (opcional)
Controles de cortinas de parabrisas
Elevador de sillas de ruedas (opcional)
Ralentí rápido
Freno de motor con transmisión I-Shift
Lavador de parabrisas superior (opcional) y lavador de faros delanteros
Descongelador de parabrisas superior
Iluminación interior Tacómetro Nivel de combustible Indicador de presión de aceite Unidad de control de climatización
Velocidad de ventiladores
Recircular
Configuración de la temp. del área del conductor
Configuración de la temp. del área de pasajeros
Desempañador de parabrisas
Hacia el frente y hacia los pies
Hacia el frente
Selector Fahrenheit/Celsius
Aire delcompartimiento superior del pasajero
Rejillas de ventilación
Control de ventiladores de escotillas del techo (opcional)
Indicador de nivel de DEF (líquido de escape diésel)
Temperatura del refrigerante de motor
Presión del Turbo Boost (sobrealimentación del motor)
Presión de airede los frenos traseros (primaria)
Pantallade información al conductor (DID)
Indicadores
Velocímetro
Presión de aire de los frenos delanteros (secundaria)
Iluminación del área del conductor
Control de brilloFaros antiniebla (opcional)
Luces de advertencia intermitentes
Luces de lectura
CONTROLESDEL TABLERO
ILUMINACIÓN
PARABRISAS OTROS PUERTAS AUDIO/VIDEO
IMPORTANTE
MEDIDORES CLIMA DEL AMBIENTE
IMPORTANT - To prevent damage to the drive train components, disconnect axle shafts or driveshaft before towing
LIGHTING
27 Headlights and Exterior Lighting
28 Fog Lights (Optional)
29 Hazard W arning Flashers
30 Reading Lights
31 Interior Lighting
32 Driver’s Area Lighting
33 Brightness Control
gauges
34 Tachometer
35 Telltale Lights
36 Speedometer
37 Front Brake Air Pressure (secondary)
38 Fuel Level
39 Rear Brake Air Pressure (Primary)
40 Driver Information Display (DID)
41 Oil Pressure Indicator
42 DEF Level (Diesel Exhaust Fluid) Indicator
43 Engine Coolant T emperature
44 Turbo Boost Pressure
windshield
49 Upper Windshield Wipers (Optional)
50 Upper Windshield W asher (Optional) and Headlights Washer
51 Upper Windshield Defrosting
door
62 Close Door
63 Open Door
other
52 Tire Pressure Monitoring System Display (TPMS)
53 Windshield Blind Controls
54 Wheelchair Lift (Optional)
55 Fast Idle
56 Engine Br ake with I-Shift Transmission
57 Engine Stop Override
58 Ignition Switch
59 Traction Control System
60 Vehicle Clearance Information
61 Stop/Service Chime (Optional)
audio/video
64 Passenger Audio/Video Selector (see detail page)
65 Driver Dashboard Radio (see detail page)
2728
29
30 3132
33
34 36
3743
44
3841 42 3940
35
3535
3535
climate
45 HVAC Control Unit
46 Passenger Overhead Air
47 Air Registers
48 Roof Hatch F an Control (Optional)
45
46
4748
4747
4950
51
52
53
55
5958
53
56
54
57 61
60
6263
64
65
Fan Speed
Recirculate
Driver’s Area T emperature Setting
Passenger Area T emperature Setting
Windshield Defogger
Panel and F ootwell
Panel
Fahrenheit / Celsius Selector
(press and hold to lower; press twice and hold to r aise)
(press and hold to lower; press twice and hold to r aise)
adio station.
25
26
Faros delanteros e iluminación exterior
Limpiaparabrisas superior (opcional) Pantalla del sistema de monitoreo de presión de las llantas (TPMS) Anulación de parada del motor Cerrar puertas Selector de audio/video del pasajero (véase la página de detalles)
Radio del tablero del conductor(véase la página de detalles)
Abrir puertas
-Para evitar daños en los componentes de la transmisión, desconecte los ejes propulsores y el eje de transmisión antes de remolcar el vehículo
Interruptor de encendido
Sistema de control de tracción
Información de altura del vehículo
Campanilla de parada/servicio (opcional)
Controles de cortinas de parabrisas
Elevador de sillas de ruedas (opcional)
Ralentí rápido
Freno de motor con transmisión I-Shift
Lavador de parabrisas superior (opcional) y lavador de faros delanteros
Descongelador de parabrisas superior
Iluminación interior Tacómetro Nivel de combustible Indicador de presión de aceite Unidad de control de climatización
Velocidad de ventiladores
Recircular
Configuración de la temp. del área del conductor
Configuración de la temp. del área de pasajeros
Desempañador de parabrisas
Hacia el frente y hacia los pies
Hacia el frente
Selector Fahrenheit/Celsius
Aire delcompartimiento superior del pasajero
Rejillas de ventilación
Control de ventiladores de escotillas del techo (opcional)
Indicador de nivel de DEF (líquido de escape diésel)
Temperatura del refrigerante de motor
Presión del Turbo Boost (sobrealimentación del motor)
Presión de airede los frenos traseros (primaria)
Pantallade información al conductor (DID)
Indicadores
Velocímetro
Presión de aire de los frenos delanteros (secundaria)
Iluminación del área del conductor
Control de brilloFaros antiniebla (opcional)
Luces de advertencia intermitentes
Luces de lectura
Escapar/Ingresar (pantalla de información al conductor)Ingresar: levante brevemente este botón.Escapar: presione brevemente este botón.
Arriba/Abajo (pantalla de información al conductor)Utilice este botón para desplazarse hacia arriba o hacia abajo por los menús.
Aumentar (I-Shift)
Freno/Retardador del motor
Cortina del parabrisas - Lado del pasajero(mantenga presionado el botón para bajarla; presione dos veces y mantenga presionado el botón para elevarla)
Volumen (radio del tablero)Utilice este botón para subir o bajar el volumen de la radio del tablero (radio del conductor).
Buscar (radio del tablero)Utilice este botón para buscar una estación de radio.
CONTROLESDEL TABLERO
ILUMINACIÓN
PARABRISAS OTROS PUERTAS AUDIO/VIDEO
IMPORTANTE
MEDIDORES CLIMA DEL AMBIENTE
Indicates that a serious problem has been detected. Immediately park the coach in a safe place and stop the engine. This telltale light may be accompanied with a message in the Driver Information Display and a diagnostic troubleshooting code will be stored to ease identification
Indicates that a problem has been detected and must be checked at the next stop. This telltale light may be accompanied with a message in the Driver Information Display and a diagnostic troubleshooting code will be stored to ease identification
This telltale light illuminates when there is a new information message or an abnormal status is detected by the electronic control unit. A pictogram, text or both are shown in the Driver Information Display in addition to the INFO telltale light. Make sure the indicated fault is checked at the next stop.
Turn Signal IndicatorsFlashes when the right or left turn signals are activated. Signal right and left turns by operating the multi-function lever. See “Steering Column Controls” in this chapter.
- The turn signals are automatically activated when the vehicle is backing up.
Parking Brake or Emergency Brake AppliedIlluminates when the emergency/parking brake is applied. The control valve is located on the left control panel. An audible alert will sound if ignition is turned to OFF and the parking brake is not engaged.
Illuminates when the high beams are selected. High and low beams are selected with the multi-function lever.
Aftertreatment System Malfunction (Malfunction Indicator Lamp) Indicates a failure of an emission control device. May illuminate at the same time as the CHECK amber warning light. The lamp will go out after 3 completed ignition on-ride-ignition o� cycles. Vehicle can be driven to end of shift. Call for service.
Cruise Control Indicates that the cruise control is enabled.
Cruise Control Set SpeedIndicates that a cruising speed is set and stored in the memory.
High Exhaust System Temperature (HEST)Illuminates to notify the driver of potentially hazardous exhaust gas temperature at the exhaust system di�user.
WARNING - During regeneration, exhaust temperature may reach up to 1200°F (650°C) at the particulate filter. When parking the vehicle, if this telltale light is illuminating, make sure that the exhaust system di�user is away from people or any flammable materials, vapors or structures.
DPF Regeneration RequestIlluminates to notify the driver that a manual stationary regeneration will be required soon.
Low DEF levelIlluminates when there is less than 2.6 gallons (10 liters) of DEF left in the tank.
CAUTION - This telltale light starts flashing when there is only 2.5 liters (0.6 gallons) left in the tank.
If the vehicle is kept in operation with an empty DEF tank, and engine derate will eventually occur, limiting the speed to 5 mph.
Intake Air Preheater On – Wait Before StartingIlluminates when the intake air preheater element is in function. Wait until this telltale light has turned o� before starting the engine.
Flat Tire (with Optional Tire Pressure Monitoring System)Illuminates when a tire pressure is 25% below the target tire pressure.
Hill Start AssistIndicates a malfunction of the Hill Start Assist function. This function might not be available.
Antilock Brake System (ABS) Illuminates when the ABS is not available or when the ABS is malfunctioning. Since the ABS system does not operate at less than 4 mph (7 km/h), the indicator will remain illuminated until the coach reaches that speed.
Trailer Antilock Brake System (ABS)Illuminates when the trailer ABS is not available or when the trailer ABS is malfunctioning.
TCS/ESC - Traction Control System and Electronic Stability ControlThis telltale illuminates and stays on whenever TCS or ESC is disabled due to a diagnostic fault code.
During an ESC or TCS intervention, the telltale will blink rapidly to indicate this action.
When in TCS Mud/Snow mode, this telltale will blink continuously to indicate that this mode is active. When the TCS Mud/Snow is active, the ESC is disabled at speed lower than 25 mph (40 km/h), for this reason, the telltale will stop blinking and will stay on.
AlternatorsIndicates an alternator problem. One of the alternators is not charging.
TABLERO DE INDICADORES
STOP (DETENERSE) FALLA DEL SISTEMA DE TRATAMIENTO POSTERIOR (LÁMPARA INDICADORA DE FALLA)
PRECALENTADOR DEL AIRE DE ADMISIÓN ENCENDIDO - ESPERE ANTES DE ARRANCAR
LLANTA DESINFLADA (CON SISTEMA OPCIONAL DE CONTROL DE PRESIÓN DE LLANTAS)
HILL START ASSIST (ASISTENCIA PARA ARRANQUE EN PENDIENTE)
SISTEMA DE FRENOS ANTIBLOQUEO (ABS)
SISTEMA DE FRENOS ANTIBLOQUEO (ABS) DEL TRÁILER
TCS/ESC - SISTEMA DE CONOTROL DE TRACCIÓN Y CONTROL ELECTRÓNICO DE ESTABILIDAD
ALTERNADORES
CONTROL DE CRUCERO
VELOCIDAD DE CONTROL DE CRUCERO CONFIGURADA
TEMPERATURA ALTA DEL SISTEMA DE ESCAPE (HEST)
SOLICITUD DE REGENERACIÓN DEL FILTRO DE PARTÍCULAS DIÉSEL
NIVEL BAJO DE LÍQUIDO DE ESCAPE DIÉSEL (DEF)
CHECK (REVISAR)
INFORMACIÓN
INDICADORES DE SEÑAL DE GIRO
FRENO DE ESTACIONAMIENTO O DE EMERGENCIA ACTIVADO
LUCES ALTAS
Indica que se ha detectado un problema grave. Estaciónese inmediatamente en un lugar seguro y detenga el motor. Este indicador puede verse acompañado por un mensaje en la pantalla de información al conductor. Se almacenará un código de diagnóstico para la solución de problemas para facilitar la identificación del problema.
Indica una falla de un dispositivo de control de emisiones. Puede iluminarse junto con la luz de advertencia ámbar del indicador CHECK. La lámpara se apagará luego de tres ciclos completos de arranque y apagado durante el viaje. Se puede seguir conduciendo el vehículo hasta finalizar el turno.Llame al servicio.
Se ilumina cuando el precalentador del aire de admisión se encuentra en funcionamiento. Espere que este indicador se apague antes de arrancar el motor.
Se ilumina cuando la presión de una llanta se halla un 25 % por debajo de la presión esperada.
Indica una falla en la función Hill Start Assist. Esta función puede no estar disponible.
Se ilumina cuando el sistema no está disponible o tiene fallas. Debido a que el sistema ABS no funciona a menos de 4 mph (7 km/h), el indicador permanecerá iluminado hasta que el vehículo alcance esa velocidad.
Se ilumina cuando el sistema del tráiler no está disponible o tiene fallas.
Este indicador se ilumina y queda encendido cuando el TCS o el ESC se desactiva a causa de un código de falla de diagnóstico.
Durante una intervención del ESC o del TCS, el indicador parpadea rápidamente para notificar esta acción.
Este indicador parpadea continuamente cuando se activa el modo TCS lodo/nieve. Cuando se activa el modo TCS lodo/nieve, el ESC se desactiva a una velocidad menor que 25 mph (40 km/h). Por esta razón, el indicador dejará de parpadear y quedará encendido.
Indica que el control de crucero está activado.
Indica que la velocidad de crucero se ha configurado y está almacenada en la memoria.
Se ilumina para informar al conductorsobre posibles riesgos de la temperatura del gas de escape en el difusor del sistema de escape.
Se ilumina para informar al conductor que pronto deberá realizarse una regeneración manual estacionaria.
Se ilumina cuando quedan menos de 2,6 galones (10 litros) de DEF en el tanque.
ADVERTENCIA - Durante la regeneración, la temperatura de escape puede alcanzar los 1200 ºF (160 ºC) en el filtro de partículas. Al estacionar el vehículo, si se ilumina este indicador, asegúrese de que el difusor del sistema de escape no esté cerca de personas o de materiales, vapores y estructuras inflamables
Si el vehículo está en funcionamiento con el tanque de DEF vacío, eventualmente el motor disminuirá la potencia y se limitará la velocidad a 5 mph.
Indica un problema en los alternadores. Uno de los alternadores no se está cargando.
ATENCIÓN - Este indicador comienza a parpadear cuando quedan solo 2,5 litros (0,6 galones) en el tanque.
Indica que se ha detectado un problema y que se debe realizar una revisión en la siguiente parada. Este indicador puede verse acompañado por un mensaje en la pantalla de información al conductor.Se almacenará un código de diagnóstico para la solución de problemas para facilitar la identificación del problema.
Este indicador se ilumina cuando hay un nuevo mensaje de información o cuando la unidad control electrónico detecta un estado anormal. Además del indicador INFO, en la pantalla de información del conductor aparecen un pictograma, un texto o ambos. Asegúrese de revisar la falla indicada en la siguiente parada.
Se iluminan de manera intermitente cuando se activa la señal de giro a la derecha o a la izquierda. Indican giros a la derecha o a la izquierda cuando se opera la palanca multifunción. Véase “Controles de columna de dirección” en este capítulo.NOTA - las señales de giro se activan de manera automática cuando el vehículo retrocede.
Se ilumina cuando se utiliza el freno de emergencia/estacionamiento. La válvula de control se ubica en el panel de control izquierdo. Sonará una alarma audible si se apaga el vehículo y no se activa el freno de estacionamiento.
Se ilumina cuando se seleccionan las luces altas. Las luces altas y bajas se seleccionan con la palanca multifunción.
Stop Indicates that a serious problem has been detected. Immediately park the coach in a safe place and stop the engine. This telltale light may be accompanied with a message in the Driver Information Display and a diagnostic troubleshooting code will be stored to ease identification of the problem.
CheckIndicates that a problem has been detected and must be checked at the next stop. This telltale light may be accompanied with a message in the Driver Information Display and a diagnostic troubleshooting code will be stored to ease identification of the problem.
InformationThis telltale light illuminates when there is a new information message or an abnormal status is detected by the electronic control unit. A pictogram, text or both are shown in the Driver Information Display in addition to the INFO telltale light. Make sure the indicated fault is checked at the next stop.
Turn Signal IndicatorsFlashes when the right or left turn signals are activated. Signal right and left turns by operating the multi-function lever. See “Steering Column Controls” in this chapter.
NOTE - The turn signals are automatically activated when the vehicle is backing up.
Parking Brake or Emergency Brake AppliedIlluminates when the emergency/parking brake is applied. The control valve is located on the left control panel. An audible alert will sound if ignition is turned to OFF and the parking brake is not engaged.
High BeamIlluminates when the high beams are selected. High and low beams are selected with the multi-function lever.
Aftertreatment System Malfunction (Malfunction Indicator Lamp) Indicates a failure of an emission control device. May illuminate at the same time as the CHECK amber warning light. The lamp will go out after 3 completed ignition on-ride-ignition o� cycles. Vehicle can be driven to end of shift. Call for service.
Cruise Control Indicates that the cruise control is enabled.
Cruise Control Set SpeedIndicates that a cruising speed is set and stored in the memory.
High Exhaust System Temperature (HEST)Illuminates to notify the driver of potentially hazardous exhaust gas temperature at the exhaust system di�user.
WARNING - During regeneration, exhaust temperature may reach up to 1200°F (650°C) at the particulate filter. When parking the vehicle, if this telltale light is illuminating, make sure that the exhaust system di�user is away from people or any flammable materials, vapors or structures.
DPF Regeneration RequestIlluminates to notify the driver that a manual stationary regeneration will be required soon.
Low DEF levelIlluminates when there is less than 2.6 gallons (10 liters) of DEF left in the tank.
CAUTION - This telltale light starts flashing when there is only 2.5 liters (0.6 gallons) left in the tank.
If the vehicle is kept in operation with an empty DEF tank, and engine derate will eventually occur, limiting the speed to 5 mph.
Intake Air Preheater On – Wait Before StartingIlluminates when the intake air preheater element is in function. Wait until this telltale light has turned o� before starting the engine.
Flat Tire (with Optional Tire Pressure Monitoring System)Illuminates when a tire pressure is 25% below the target tire pressure.
Hill Start AssistIndicates a malfunction of the Hill Start Assist function. This function might not be available.
Antilock Brake System (ABS) Illuminates when the ABS is not available or when the ABS is malfunctioning. Since the ABS system does not operate at less than 4 mph (7 km/h), the indicator will remain illuminated until the coach reaches that speed.
Trailer Antilock Brake System (ABS)Illuminates when the trailer ABS is not available or when the trailer ABS is malfunctioning.
TCS/ESC - Traction Control System and Electronic Stability ControlThis telltale illuminates and stays on whenever TCS or ESC is disabled due to a diagnostic fault code.
During an ESC or TCS intervention, the telltale will blink rapidly to indicate this action.
When in TCS Mud/Snow mode, this telltale will blink continuously to indicate that this mode is active. When the TCS Mud/Snow is active, the ESC is disabled at speed lower than 25 mph (40 km/h), for this reason, the telltale will stop blinking and will stay on.
AlternatorsIndicates an alternator problem. One of the alternators is not charging.
-Para evitar daños en los componentes de la transmisión, desconecte los ejes propulsores y el eje de transmisión antes de remolcar el vehículo
TABLERO DE INDICADORES
STOP (DETENERSE) FALLA DEL SISTEMA DE TRATAMIENTO POSTERIOR (LÁMPARA INDICADORA DE FALLA)
PRECALENTADOR DEL AIRE DE ADMISIÓN ENCENDIDO - ESPERE ANTES DE ARRANCAR
LLANTA DESINFLADA (CON SISTEMA OPCIONAL DE CONTROL DE PRESIÓN DE LLANTAS)
HILL START ASSIST (ASISTENCIA PARA ARRANQUE EN PENDIENTE)
SISTEMA DE FRENOS ANTIBLOQUEO (ABS)
SISTEMA DE FRENOS ANTIBLOQUEO (ABS) DEL TRÁILER
TCS/ESC - SISTEMA DE CONOTROL DE TRACCIÓN Y CONTROL ELECTRÓNICO DE ESTABILIDAD
ALTERNADORES
CONTROL DE CRUCERO
VELOCIDAD DE CONTROL DE CRUCERO CONFIGURADA
TEMPERATURA ALTA DEL SISTEMA DE ESCAPE (HEST)
SOLICITUD DE REGENERACIÓN DEL FILTRO DE PARTÍCULAS DIÉSEL
NIVEL BAJO DE LÍQUIDO DE ESCAPE DIÉSEL (DEF)
CHECK (REVISAR)
INFORMACIÓN
INDICADORES DE SEÑAL DE GIRO
FRENO DE ESTACIONAMIENTO O DE EMERGENCIA ACTIVADO
LUCES ALTAS
Indica que se ha detectado un problema grave. Estaciónese inmediatamente en un lugar seguro y detenga el motor. Este indicador puede verse acompañado por un mensaje en la pantalla de información al conductor. Se almacenará un código de diagnóstico para la solución de problemas para facilitar la identificación del problema.
Indica una falla de un dispositivo de control de emisiones. Puede iluminarse junto con la luz de advertencia ámbar del indicador CHECK. La lámpara se apagará luego de tres ciclos completos de arranque y apagado durante el viaje. Se puede seguir conduciendo el vehículo hasta finalizar el turno.Llame al servicio.
Se ilumina cuando el precalentador del aire de admisión se encuentra en funcionamiento. Espere que este indicador se apague antes de arrancar el motor.
Se ilumina cuando la presión de una llanta se halla un 25 % por debajo de la presión esperada.
Indica una falla en la función Hill Start Assist. Esta función puede no estar disponible.
Se ilumina cuando el sistema no está disponible o tiene fallas. Debido a que el sistema ABS no funciona a menos de 4 mph (7 km/h), el indicador permanecerá iluminado hasta que el vehículo alcance esa velocidad.
Se ilumina cuando el sistema del tráiler no está disponible o tiene fallas.
Este indicador se ilumina y queda encendido cuando el TCS o el ESC se desactiva a causa de un código de falla de diagnóstico.
Durante una intervención del ESC o del TCS, el indicador parpadea rápidamente para notificar esta acción.
Este indicador parpadea continuamente cuando se activa el modo TCS lodo/nieve. Cuando se activa el modo TCS lodo/nieve, el ESC se desactiva a una velocidad menor que 25 mph (40 km/h). Por esta razón, el indicador dejará de parpadear y quedará encendido.
Indica que el control de crucero está activado.
Indica que la velocidad de crucero se ha configurado y está almacenada en la memoria.
Se ilumina para informar al conductorsobre posibles riesgos de la temperatura del gas de escape en el difusor del sistema de escape.
Se ilumina para informar al conductor que pronto deberá realizarse una regeneración manual estacionaria.
Se ilumina cuando quedan menos de 2,6 galones (10 litros) de DEF en el tanque.
ADVERTENCIA - Durante la regeneración, la temperatura de escape puede alcanzar los 1200 ºF (160 ºC) en el filtro de partículas. Al estacionar el vehículo, si se ilumina este indicador, asegúrese de que el difusor del sistema de escape no esté cerca de personas o de materiales, vapores y estructuras inflamables
Si el vehículo está en funcionamiento con el tanque de DEF vacío, eventualmente el motor disminuirá la potencia y se limitará la velocidad a 5 mph.
Indica un problema en los alternadores. Uno de los alternadores no se está cargando.
ATENCIÓN - Este indicador comienza a parpadear cuando quedan solo 2,5 litros (0,6 galones) en el tanque.
Indica que se ha detectado un problema y que se debe realizar una revisión en la siguiente parada. Este indicador puede verse acompañado por un mensaje en la pantalla de información al conductor.Se almacenará un código de diagnóstico para la solución de problemas para facilitar la identificación del problema.
Este indicador se ilumina cuando hay un nuevo mensaje de información o cuando la unidad control electrónico detecta un estado anormal. Además del indicador INFO, en la pantalla de información del conductor aparecen un pictograma, un texto o ambos. Asegúrese de revisar la falla indicada en la siguiente parada.
Se iluminan de manera intermitente cuando se activa la señal de giro a la derecha o a la izquierda. Indican giros a la derecha o a la izquierda cuando se opera la palanca multifunción. Véase “Controles de columna de dirección” en este capítulo.NOTA - las señales de giro se activan de manera automática cuando el vehículo retrocede.
Se ilumina cuando se utiliza el freno de emergencia/estacionamiento. La válvula de control se ubica en el panel de control izquierdo. Sonará una alarma audible si se apaga el vehículo y no se activa el freno de estacionamiento.
Se ilumina cuando se seleccionan las luces altas. Las luces altas y bajas se seleccionan con la palanca multifunción.
operating the wheelchair lift and remote
LOWER PLATFORMPress and hold DOWN button until platform contacts ground.
Verify that bridgeplate is in upright position.
Deploy each handrail by lifting up and outward to a vertical position and then pushing down to lock into place.
Carefully place wheelchair in center of platform, preferably facing outward (away from vehicle), and lock wheelchair brakes.
Pull safety belt from retractor on handrail and fasten to other handrail.
RAISE PLATFORMNOTE: These two steps apply only to F9TF models that stop upward platform movement at an intermediate level (refer to Figure ).
1- PARTIALLY RAISE PLATFORM - Press and hold UP button until platform stops at intermediate height.
2- OPEN VEHICLE DOOR - Fully open vehicle sliding door located above lift. The lift operator, or attendant should do this.
FOR OTHER MODELSPress and hold UP button until platform stops at floor height and bridgeplate lowers onto vehicle floor.
Release wheelchair brakes, and carefully board passenger into vehicle.
Preset 1- 6 Buttons• Radio: Push and release to recall preset station. • Radio: Push and hold to store preset station.
Down Arrow Button• Radio: Manual tuning down.
Menu Button• Radio: Push and release to access menu.
OK• Radio: Seek. • CD/USB: Push and release to select next tr ack. • CD/USB: Push and hold for fast forward.
Eject CD Button
Up Arrow Button• Radio: Manual tuning up.
ESC• Radio: Seek. • CD/USB: Push and release to select previous tr ack. • CD/USB: Push and hold for fast reverse. • iPod: Push and hold to enter the iPod menu (Optional).
CD Slot• Insert / Remove CD.
Rotary Knob / Power Button • Push: Power On and O� . • Turn: Volume adjust and audio value update.
TA (Tra�c Information/News)• Radio: Switch tr affic On or O�. • Radio: Cancel ongoing tr affic or news message.
Radio Select Mode• Radio: Choose from FM1, FM2, FM3 (Optional),
AM, Weather band and Satellite radio (Optional).
Audio Button• General: Audio settings.
CD/Aux Mode Select• CD/USB: Switch between sources other than r adio.
1 Power enable switch - Provides power to the pendant and thereby enables the lift.
2 Deploy - Platform moves outward from lift compartment.
3 Stow - Platform moves downward toward stow level and then retracts into lift compartment. If platform is below stow level, it must first be raised above stow level.
4 Down - Platform lowers toward ground level. Bridgeplate automatically rises when platform drops below floor level.
5 Up - Platform rises toward vehicle floor level. Bridgeplate automatically lowers when platform arrives at floor level.
DEPLOY PLATFORMPress and hold DEPLOY button until platform is completely extended from lift compartment.
NOTE: Platform cannot be moved up or down unless platform is fully extended.
driver dashboard radio
1
4
2
3
5
prevostcar.com
BRITISH COLUMBIA • CALIFORNIA • ALBERTA • TEXAS • ONTARIO • TENNESSEE • FLORIDA • NEW JERSEY • QUEBEC
© 2016 All rights reserved. “Prevost”, the Prevost logotype, Prevost model designations and all other Prevost related marks, images and symbols are trademarks, registered trademarks and/or exclusive properties.
All other trademarks are property of their respective owners. Printed in Canada. 16/10/1k
To order parts
PREVOST US PARTS CUSTOMER SERVICE
2250 Point Blvd., Suite 410 Elgin, Illinois 60123 Tel Coach Parts: 1-800-621-5519 Tel Transit Parts: 1-877-999-8808 Fax: 1-877-999-8809
PREVOST CANADA PARTS CUSTOMER SERVICE
2955-A Watt Street Quebec City, Quebec G1X 3W1 Tel: 1-800-463-8876 Fax: 1-800-939-0133
Prevost Parts & Service Centers
USA
Cal i fornia
3384 De Forest Circle Mira Loma, California 91752 Tel: 1-800-421-9958 Fax: 1-951-360-2560
Flor ida
6931 Business Park Blvd. North Jacksonville, Florida 32256 Tel: 1-800-874-7740 Fax: 1-904-886-0092
New Jersey
201 South Avenue South Plainfield, New Jersey 07080 Tel: 1-800-223-0830 Fax: 1-908-222-7304
Tennessee
800 South Cartwright Street Goodlettsville, Tennessee 37072 Tel: 1-877-299-8881 Fax: 1-615-299-8816
Texas - Ft. Worth
15200 Frye Road Fort Worth, Texas 76155 Tel: 1-866-773-8678 Fax: 1-817-685-0460
Texas - Houston
11851 Cutten Road Houston, Texas 77066 Tel: 1-877-602-0273 Fax: 1-281-315-1571
canada
Alberta
292 MacDonald Crescent Fort McMurray, Alberta T9H 4B6 Tel: 1-780-713-0274 Fax: 1-780-743-0983
Bri t ish Columbia
11911 No. 5 Road Richmond, British Columbia V7A 4E9 Tel: 1-604-940-3306 Fax: 1-604-940-3384
ONTARIO
7655 Tranmere Drive Mississauga, Ontario L5S 1L4 Tel: 1-905-738-0881 Fax: 1-905-738-0891
Quebec
850, Chemin Olivier Lévis, Quebec G7A 2N1 Tel: 1-866-870-2046 Fax: 1-418-831-7432
Partes de Prevost y centros de servicio
Para solicitar partes
EE.UU.
CANADÁ
CALIFORNIA
FLORIDA
NUEVA JERSEY
TENNESSEE
TEXAS - Ft. Worth
SERVICIO AL CLIENTE PARA PARTES DE PREVOST DE EE. UU.
SERVICIO AL CLIENTE PARA PARTES DE PREVOST DE CANADÁ
TEXAS - HOUSTON
ALBERTA
COLUMBIA BRITÁNICA
ONTARIO
QUEBEC
2250 Point Blvd., Suite 410Elgin, Illinois 60123Tel. (partes para autobuses de larga distancia): 1-800-621-5519 Tel. (partes para autobuses urbanos o interurbanos): 1-877-999-8808 Fax: 1-877-999-8809
2955-A Watt StreetQuebec City, Quebec G1X 3W1 Tel: 1-800-463-8876Fax: 1-800-939-0133
© 2016 Todos los derechos reservados.“Prevost”, el logotipo Prevost, las denominaciones de modelos de Prevost y todas las demás marcas, imágenes y símbolos relacionados con Prevost, son marcas registradas y/o propiedades exclusivas.Todas las demás marcas son propiedad de sus respectivos dueños. Impreso en Canadá 16/10/1k.
COLUMBIA BRITÁNICA • CALIFORNIA • ALBERTA • TEXAS • ONTARIO • TENNESSEE • FLORIDA • NUEVA JERSEY • QUEBEC